


Woven Paper Basket DIY and my Book-aversary

I’m thrilled to release this Woven Paper Basket DIY from the cutting room floor of Weaving Within Reach to celebrate its publish date just over a year ago! I’m so proud of this book. I love how it has inspired so many people to weave in so many different ways. I’ve loved seeing your projects!
To celebrate my Book-aversary, I wanted to share the tutorial AND I wanted a BIG sale a sale in the shop! Use the code BOOKAVERSARY at checkout to receive 15% off the book Weaving Within Reach and off any of the weaving kits so you can get started making projects easily.

The Watercolor Woven Paper Basket DIY was a project designed for Weaving Within Reach, but when it came to finalizing the projects, we ran out of pages and had to make some tough decisions. This project made sense to leave out because it was the only project that wasn’t yarn, rope, or fiber of some sort. Still, I’ve always loved it and I’ve been waiting for the right time to release it. I think the Book-aversary is the perfect occasion!

WATERCOLOR WOVEN PAPER BASKET DIY
Transform simple paper and paint into a stunning container to hold your favorite bits and baubles or a treasured plant. The abstract watercolor lends this berry-basket feel a creative sensibility. Alternatively, take a page from the crafter’s book and make this basket with whatever paper you have on hand: grocery bags, chipboard, shopping bags, or upcycled gift boxes.
MATERIALS & TOOLS
- Watercolor paints
- Water
- Paintbrush
- 12” × 16” (30.5 × 40.5cm) sheet of 140 lb hot-pressed watercolor paper
- Ruler, sharp craft knife or paper cutter, glue gun with glue stick, or other adhesive (see Note), washi or gentle masking tape
FINISHED SIZE
- 41/4” (11 cm) square, 31/4” (8cm) tall
NOTE
This project can be finished without glue if preferred, though you would need to use longer strips for the base strips: At the end of the weaving, cut each strip so there is additional length to fold over, and then tuck it under the top piece of weft weaving. If your painting is one-sided and you choose this method, the white side will be facing out on every other strip along the top row.

1) Paint a piece of watercolor paper as desired. To paint the watercolor in an abstract monochrome tone, add some pigment onto your paintbrush and draw it across the top 2” (5cm) of the paper. Then, dab your paintbrush in water and spread the pigment down the page in a desired pattern, streaks, and shapes. For even more dimension, add another color or two to the wash.
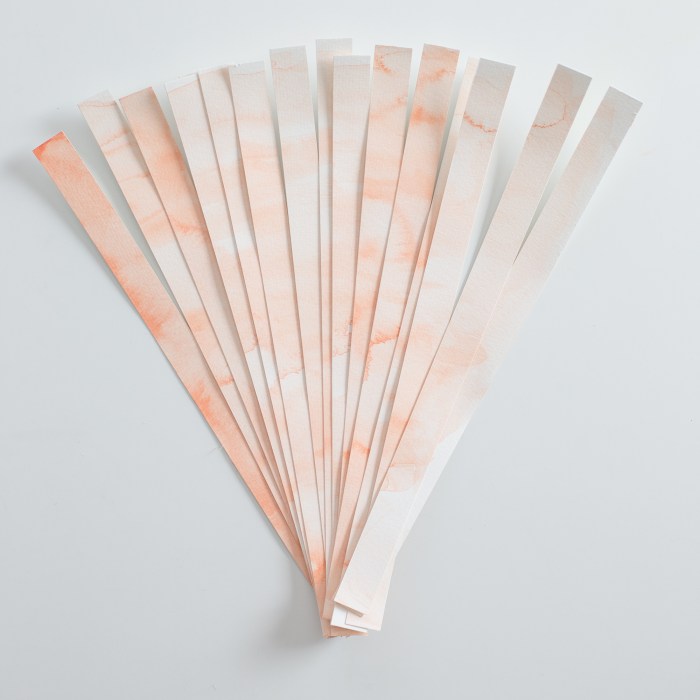
2) Using a ruler and craft knife, cut the painted watercolor paper into 16 strips, each 3/4” (2cm) wide and 12” (30 .5cm) long.

3) Of these cut strips, you will be making 4 longer strips to be the weft around the sides of the basket. Overlap the ends of 2 strips by 1/2” (1 .3cm), paint side facing up, then glue them together. You may want to use a ruler to ensure the lines of these strips remain straight. Repeat this process 3 more times. Set aside the 4 long strips.

4) Place 5 of the remaining 3/4” (2cm) strips parallel to each other on a work surface, with a 1/8” (3mm) space between each strip. You may want to secure one side of the initial set of strips with washi tape. (Tape the strips at the very end in case some paint comes off upon removal.) Alternatively, weave the the basket as a tight weave (i.e., no space in between the strips), if desired.

5) Weave 5 more of the 3/4” (2cm) strips in an over/under pattern perpendicular to the first five strips, such that you center the 5 × 5 weaving area in the middle. Place a dot of glue between the 2 strips at each corner to secure spacing. This is the base of your basket. Let dry.

6) Fold over every other strip that comes from “under,” so that these have a firm edge to fold against.

7) Next, flip your basket base over, paint side down. Fold over the all the strips you didn’t in step 6. Use the straight edge of the basket base to make a straight fold. Refold the strips from step 6 the other way along the fold line so that all the strips point up. These are your warp strips.

8) Measure the width of one side of your basket. Holding the longer strips (from step 3), pre-bend the paper at this distance, 4 times. Lastly, measure 1 1/2” (3.8 cm) away from the last bend, and cut here. This extra strip will tuck in. Repeat bending and cutting for each of the long strips.

9) Starting at a corner, weave a long strip in an over/under pattern around the warp strips. Weave the extra 1 1/2” (3.8 cm) over the beginning part of the strip, following the over/under pattern.

10) Repeat step 9 with the remaining long strips, so that you alternate the over/under pattern as you go. You may want to adjust the corner you start on for any given strip to hide the glued end seam from step 3 underneath a strip.

11) Adjust the spacing on your weft strips so that these strips are about 1/8” (3mm) apart. Alternatively, push them tightly against each other if that is your preference.

12) Once your spacing is set, secure strips at the top with a spot of glue. To finish without glue see Note. To make a nice edge to your basket, fold the warp strips either to the inside or outside of the basket, so that the fold wraps over the top-most strip, and secure it with glue. Trim the warp strips so their length matches the top layer of the basket.
I hope you love making it as much as I did doing this Woven Paper Basket DIY. Finally, tag me on Instagram (@flaxandtwine) to share your Woven Paper Basket DIY and other projects from Weaving Within Reach. I can’t wait to see them!
Top photo styled by Natalie Warady, and taken by Rebecca Stumpf.
Leave a comment
This site is protected by reCAPTCHA and the Google Privacy Policy and Terms of Service apply.