Monday, April 2, 2012

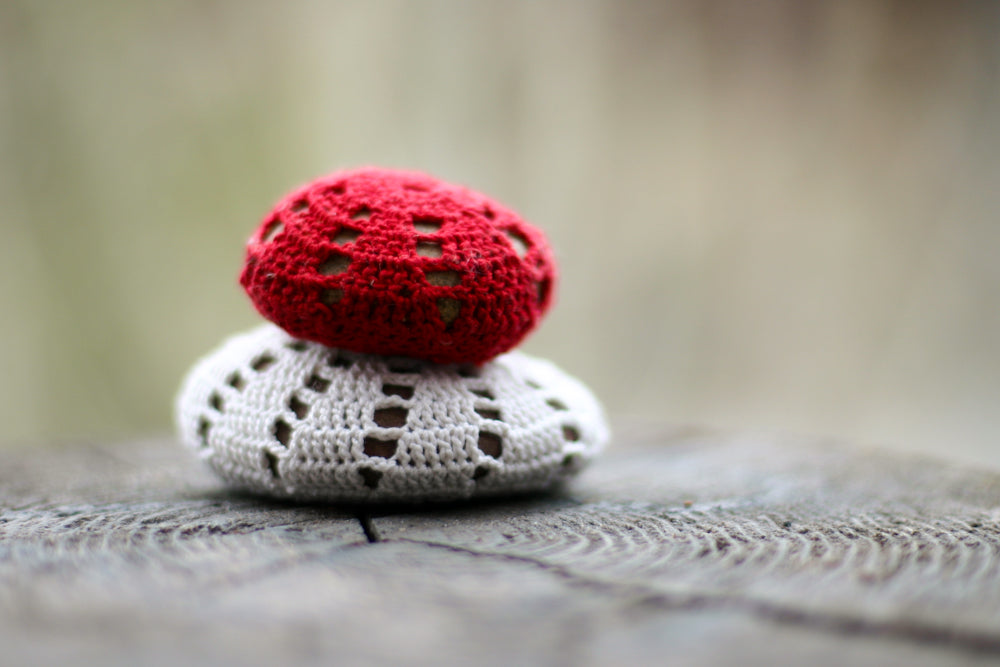
Crochet-Covered Easter Eggs –a DIY tutorial

After finally tackling how to crochet rocks from a pattern, I got it in my brain that I wanted to  create my own crochet motif for a rock.  That way, I figured I could easily do an original tutorial for you all.  Then, it occurred to me, like a lightbulb, that crocheting rocks is an awful lot like crocheting on top of an egg–how fun! and just in time for easter. So, I set to work creating two different patterns for eggs. Below, I've photograhed a detailed step-by-step tutorial for one of them and provided a written pattern for the other.
Crocheting the egg was quite similar to crocheting on a stone and all of it quite easier than I ever thought it would be.  So if you've ever considered trying it, give it a whirl.  It truly is as simple as slip stitches, double and triple crochets.   I think they provide a beautiful, natural look for Easter, though you could certainly do them in other colors as well.  
I have not quite figured out how to read or create a crochet chart at this point, so I apologize to those for whom chart patterns is the way they work.  And, being a newbie to crochet pattern writing, if any of you experts out there see a way to improve my patterns, please do let me know.
UPDATE! Strangely, some people have had a hard time seeing anything below this point in the post though I see them from every computer/browser combination I've tried.  Still, if the directions are not visible or available, you may email me at flaxandtwine (at) gmail (dot) com and I will happily email you the pattern. xo anne

I had a ball making these.  I love gaining skill in a new craft.  Hope you all give them a try! Here is the pattern for The Helm's Egg.


Materials: 
Size 10 crochet thread
Size 7 (1.5mm) needle
Hard boiled eggs

Abbreviations:
ch: chain 
sc: single crochet
sts: stitches
sl st: slip stitch
tc: triple crochet

Please note that there are multiple photos per each round of crochet to show you as much as possible. 

Round 1: Make a chain 10 sts long.  Join the chain with a sl st to form a circle.
 
Round 2: Chain 1 sc through the center of the circle 14 times. Join with a sl st.
 
Round 3: Ch 10, *skip one st and tc in next st, ch 5, repeat from * until beginning, sl st through 4th chain of first ch 10 made.
 
Round 4: Ch 1, *Sc in next 5 chs. When you get to tc from prior round, sc in that st twice. Repeat from * until beginning,  sl st through first sc.
Round 5: Ch 5, *skip one st and dc in next st, ch 2, repeat from * until beginning, sl st through 3rd chain of first ch 5 made.
Round 6: *Ch 14, skip one st and sc in next st, repeat from * to end, sl st into beginning of round.  If you are crocheting on the bigger side, or your egg is smaller, here is the place to adjust the pattern.  To make the cover smaller ch 10 instead of 14.
  
Round 7: Ch 6 , sc in next space, *ch 10, sc in next space, repeat from * to end.  To adjust your size, you can make these chains shorter as well.
 
 
Round 8: Ch 4, *sc in next space, ch 3, repeat from * to end of round.  This will start to make a little pocket with your crocheted piece.  Before this round is finished, try it on your egg to make sure it will fit. If need be, adjust the prior round to help it fit.  About half way through, you should continue crocheting on the egg itself.  Some of your stitches will be pulled more apart than others depending on how tight the fit is.  Pull the end through the last loop.  Weave in the loose ends.


Here is the pattern for the Grid Egg

Materials: 
Size 10 crochet thread
Size 7 (1.5mm) needle
Hard boiled eggs

Abbreviations:
ch: chain 
sc: single crochet
sts: stitches
sl st: slip stitch
tc: triple crochet

Round 1: Make a chain 16 sts long.  Join the chain with a sl st to form a circle.
Round 2: Chain 1 sc through the center of the circle 20 times. Join with sl st.
Round 3: Ch 4, *dc in next st, ch1, repeat from * to end of round, sl st through 3rd chain of first ch 4 made.
Round 4: Ch 5, *dc in next st, ch 2  , repeat from * to end of round, sl st through 3rd chain of first ch 6 made.
Round 5: Ch 8, tc in next st, ch 3, repeat from * to end of round, sl st through 4th chain of first ch 9 made. 
Round 6: ch 10, sc in next stitch, repeat to end of round, sl st to complete round.
Round 7: ch 4, *sc in next space, ch 1, repeat from * to end of round, placing the crochet piece over the egg to finish as you get to the end. 
If you need to adjust this to fit the egg, try making Round 6 chain shorter or longer, or increasing/decreasing the chains in between the sc in Round 7. 
Weave in all loose ends.

Here's wishing you a very merry Easter holiday with you and yours.  Hopefully, you find time to make one of these beauties somewhere along the way! 

32 comments:

  1. Okay, first the stones, now eggs, I have to learn how to crochet!

    ReplyDelete
  2. My grandmother crocheted—and taught me when I was a little girl. Any time I see the delicate, doily-like stitches like hers, they make me smile. These did. Love your crocheted eggs.

    ReplyDelete
    Replies
    1. I'm so glad! You should try them :). I've never crocheted so teeny tiny before. I loved it.

      Delete
  3. These are just so beautiful, truly. How can something so simple be so pretty? You did a wonderful job. I want to try it on stones, too. Wow.

    ReplyDelete
    Replies
    1. Lynne, Thanks so much. Definitely give it a whirl, so much fun to make. And, somehow, so satisfying!

      Delete
  4. such a perfect way to take the crocheted stones and make them seasonal! lovely and wonderfully creative!

    ReplyDelete
  5. very cute and classy!
    http://ilovedoityourself.blogspot.fr/

    ReplyDelete
  6. So beautiful! I think I love the eggs more than the stones!

    ReplyDelete
  7. Beautiful!
    Saying hello from Maya Luna ;)
    xo

    ReplyDelete
  8. These crochet Easter eggs are stunning!

    ReplyDelete
  9. Just popped over from maya*made, these eggs are gorgeous! Well done! I still have learning how to crochet on my list of things to do and this project has me very inspired!
    Thanks for sharing your tutorial, I'll be back!
    xoxo
    ~ joey ~

    ReplyDelete
  10. They look absolutely lovely... and you make it seem so easy! Thanks for sharing! :D

    ReplyDelete
  11. Thanks everyone. Your comments are making me glow! xo anne

    ReplyDelete
  12. These are lovely! Can you acctually take them out and eat them though? I might just make some still in time (3 days) =)

    ReplyDelete
    Replies
    1. Actually you can. I used a wool thread and they stretch a bit. I think I'll be able to take them off and re-use them next year. With each time on and off an egg, they get more stretched out, but I think they'll last a few seasons :). Hope you make some!

      Delete
    2. I think I'll try this but with # 10 thread and instead of an egg I'll insert a balloon and blow it up and starch it. Then decorate it.

      Thanks for sharing this idea. :)

      Delete
  13. These are beautiful, you clever lady! Thanks for sharing the idea and the pattern.

    ReplyDelete
  14. These are absolutely stunning.....don't think I can crochet fast enough to whip some up before our Easter dinner, unfortunately. Very beautiful!

    ReplyDelete
  15. what a wonderful and creative way to decorate easter eggs...

    ReplyDelete
  16. Great¡¡¡
    thank you so much¡¡

    ReplyDelete
  17. Amazingly beautiful, so delicate.
    Another project on my to do list.
    Thank you for sharing!

    ReplyDelete
  18. oh, holysmokes... I just stumbled upon this blog somehow and I've been clicking 'older post' for a little while. It's been fun, but this post is the icing on the cake! I can't wait to make these. Lots of these. Lots and lots of these.
    Looking forward to more posts,
    RJ

    ReplyDelete
    Replies
    1. Thanks so much! So glad you are enjoying the blog!

      Delete
  19. Thank you for sharing :) I was looking for a free tutorial of such lacy cover for plastic eggs, just to have an idea how it's done, so that I might think of my own patterns perhaps ... :o) I wonder if it's possible to crochet all over the egg, to cover it entirely?...

    ReplyDelete
    Replies
    1. Your welcome. Definitely develop your own pattern and then come back and tell us where to find it! Yes, you could cover the egg entirely, you would just continue decreasing the number of stitches making the rounds progressively smaller. Test it over the egg as you go. Happy Easter!

      Delete
  20. Thank you for replying, Anne :) I need to practice first! I was thinking about decreasing, but it seems complicated... more complicated than increasing...
    Will have to play with the patterns...
    Happy Easter to you too :)

    ReplyDelete
  21. PS. Oh and...
    I just want to be able to work out several different eggs for myself, I don't mean anything interesting enough to suggest for use of others or something... :}

    ReplyDelete
  22. Wow! These are absolutely incredible!! We had to feature this in our egg post (with a link to your site, of course!) - we are so impressed. Thank you for the beautiful inspiration. Keep it coming!

    Warmest,
    Liz and Lo

    {celesteadpearl.blogspot.com}

    ReplyDelete
  23. These are so delicate and beautiful! How do you feel about someone using this pattern and selling their creations? Or altering it, but using it as a base to get their own started? Thank you!!

    ReplyDelete
  24. Hi Angela,
    Thank you for being sensitive enough to ask. This pattern was not intended for sale or production, but for personal use. I'm sure after making a few, you will be able to create your own pattern for whatever creation you intend. I wish you all the best.
    Anne

    ReplyDelete

I'd love to hear from you, please share!