Wednesday, February 15, 2012

Woven Finger-Knitting Hula-Hoop Rug DIY

Here we go!  I'm so excited to kick off this series of finger-knitting projects. For the first project, B proffered his largest ball of finger-knitting for us all to try weaving a rug! This project is super-fun and easy to do.
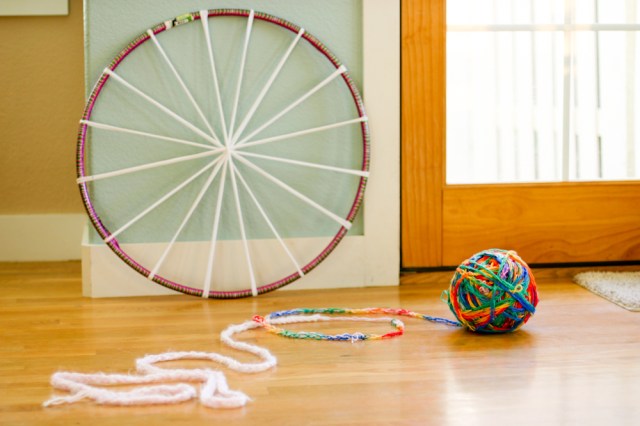
The rug was made on a hula hoop loom, using an old t-shirt for the warp and a massively huge ball of finger knitting for the weft. I based this project on an incredible t-shirt hula hoop rug I saw on the Disney Family Fun site, where they used strips of t-shirts for the weft. I've been wanting to try it with finger-knitting ever since.  B had completed most of this ball at school during read aloud time so I had no idea what I would find in there. What a joy to see the ball unwind and uncover its hidden textures and colors.  I haven't done a lot of weaving in my day, but I must say, I think it is very satisfying. Something about the way it builds on itself snugly and the way it revealed its character with each new stretch of finger-knitting inordinately pleased me. 
My son's ball started with four-finger finger-knitting (click here for a how-to) and switched mid-ball to single-finger finger-knitting.  Both kinds of finger-knitting use the same process, though in the latter, the knitting is done on one finger instead of four.  As a result, the strands in his ball became finer at times.  The ball was amazingly varied, ranging in the kind of finger knitting, as well as yarn thicknesses, from super thin to super thick and everything in between.  I was worried about how the variability would affect the end-product, but I love the rug for that very reason. I think that this project is forgiving overall to the quality and consistency of the finger knitting. 
I have to say that although this project was easy for the kids to work on, I think the size of it was a bit overwhelming.  It was a HUGE ball of finger-knitting, which was hard to handle for their little hands.  They tired of doing it after 5 to 10 times around the circle.  I think this project would work better if you did it bit by bit.  My suggestion is to sit down and do a little bit of finger knitting, finish it off, ball it up and add it to a basket.  When you're ready to do some weaving, add a strand or two of finger-knitting to the rug. This would help a couple of ways: 1) the ball wouldn't be so unwieldy to work with, and 2) you would "finish" weaving a strand in one sitting-very satisfying. Then, put away the rug until you have some more finger-knitting to add.  
I've been going nutty with finger-knitting.  Coming up with these projects has me just as obsessed as the kids.  Be sure to check out the gallery of projects by clicking here or on the button below.

Here is the DIY for the hula hoop rug:
Materials:
A large ball of finger-knitting (or, this can be done in stages as you complete littler strands of finger-knitting) 
An old t-shirt (I used a women's large)
Scissors
Hula hoop (this one is 28")  You can't make a rug much larger than 19" on this size.  I'm sure it would work on a bigger hula hoop as well. 
Cut the t-shirt into 10 strips, approximately 1 1/4" wide across the body of the t-shirt, under the arms.
Pull the strips across the hula-hoop in a spoke pattern, going progressively in between the spokes you've already added.
After adding the 10 strips stretched across the hula-hoop into 20 spokes, you're ready to start.
You need to create an odd number of spokes to make the weaving pattern (over/under) work.  Do this by pushing two of the spokes together.  Even out the spacing on rest of the spokes across the hula hoop.
Tie one end of the finger knitting to one of the spokes.  I started with the one that is doubled up, so I wouldn't forget.  
Right now treat each loop as one spoke. Start weaving by going over a spoke and under a spoke, around and around the circle.
If you have an extra large ball of finger-knitting, you'll have to squeeze the ball in between the spokes and re-space them afterwards. Every time you get back to the double spoke, check to make sure you haven't missed any, you should be doing the opposite (over or under) of what you did on the last round.
You want to pull the finger-knitting so that its snug, but don't pull it tight or it will make the rug gap and pucker.
Repeat this pattern around and around until the rug gets to be about 7 - 9 inches across.
Now, you will start to weave such that each of the current spokes will be divided into two spokes. For the spoke that was double, pull it apart such that you treat one as having individual spokes like the rest of the warp spokes. For the other spoke, have the two parts of the loop remain together so that you maintain an odd number of spokes.  I tied a piece of string around the one I wanted to keep together, so I would remember each time I came around the circle again.
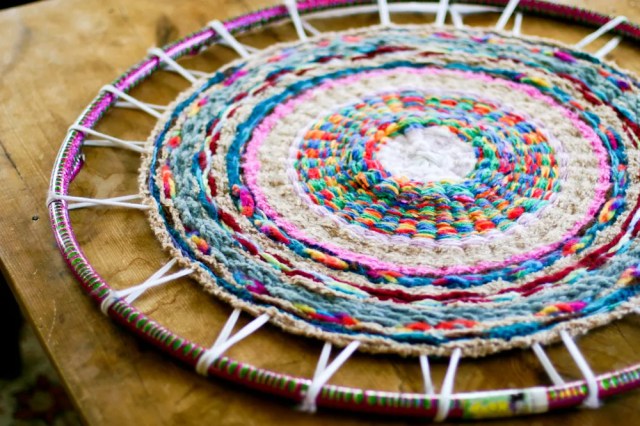
You can see in the photo below that I am going over and under each individual spoke.  The ball is still big, but not for long!  The smaller the ball got, the easier it was to work with.  
The kids found it easiest to do the weaving with the hula hoop on a table.  They enjoyed the weaving, but for only about 15 minutes at a time.
They quickly got a hang of pulling the ball over and under the warp spokes and noticed quickly if  something got off.
We found it easiest to do a bunch of weaving (over/under) in a row, as below, and then to pull the finger-knitting taut (not too tight!), such that it fits snugly against the circle.
I think the ball of finger-knitting was made for this hula-hoop, because it fit just perfectly. We wove until the ball was gone! Generally, you want to stop about 4 inches before the edge of the hula hoop.
Now comes the fun part.  Cut and tie each spoke individually.  
You want the ties to be fairly tight because if the rug starts to loosen, it will start to curl into a bowl.
Continue to cut and tie each spoke as you go around.
When you get to the double spoke, cut it, and then .  . .
 . . .take one of the pieces of the double spoke and re-weave it over and under some of the finger knitting strands next to it, and then tie.
Voila!  Finis.  It's slightly counter-intuitive, but if the rug is curling. Push the weft (finger-knitting) in towards the center of the rug and re-tighten the ties. This way the circumference of the circle is smaller and the strips of finger knitting won't be pulling as much. You can leave the rug with the ties loose as below. I think this makes a striking center piece.

Or, to hide the ties, as in the first photo in this post, I chose the "right" side of the rug, by choosing the side I thought looked the nicest.  I flipped the rug to the "wrong" side, and wove each piece of the tie into the back of the rug.
The back of the rug looks like this with the ties woven in:
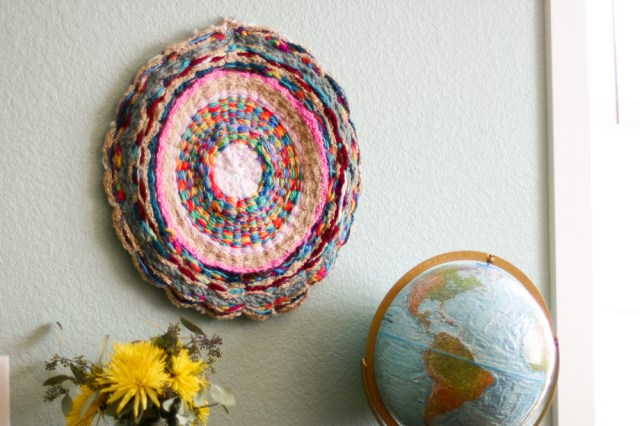
The front of the rug looked like this:
I decided I like it most on our wall. 

B says he'd like to move it into his room soon.  Hmm . . . I'll have to give that some thought.
xo anne

44 comments:

  1. If I could hug you, I would! I have been wanting to do this very thing when I saw that project in Family Fun. I just didn't have the nerve to use something different (yarn fingerknitting) instead of more t-shirt cloth. Thank you for showing me that it can be done! You are fab!

    ReplyDelete
    Replies
    1. hugs right back at you Phyllis! so glad you're going to give it a go. It was really quite simple, even though the hula hoop seems intimidating. Report back!

      Delete
  2. unbelievable - I absolutely love this - somewhere in my files I have a picture of this huge rug (maybe from anthropoplogie) and it was absolutely beautiful and just like yours - the only BIG difference is the price - I am so going to do this and thank you for taking all the time to share this with all your photos and stuff - you're terrific!

    ReplyDelete
    Replies
    1. So glad to hear it cathy. Let me know how it goes!

      Delete
  3. WOW! WOW! WOW! WOW!
    Compliments to the little knitters, too!
    Love, xxx Alessandra

    ReplyDelete
  4. Fabulous project, been wanting to do it too. Infact I've got some hoola hoops out for another project, but maybe we'll do this instead. Using the finger knitting is such a wonderful idea, as is doing it bit by bit. I'd love it if you'd join my linky party, Craft Schooling Sunday, always looking for some quality crafters to join us! And by the way, I did a little weaving project with my kids with t-shirt yarn a while back that you'll certainly like: http://www.creativejewishmom.com/2010/06/weave-fun-summer-placemats-with-tshirt-yarn.html

    ReplyDelete
  5. anne, love it! i see a weekend project coming our way. what do you think about using bulky yarn in lieu of the finger knitting??? so happy for all the creative success that has been coming from you. hope it is nourishing your soul.

    ReplyDelete
    Replies
    1. Thanks so mucy - I think super bulky yarn would work really well. Might take a bit longer but would make a beautiful rug. Nourishing my soul is right - its good to remember that and be thankful.

      Delete
  6. This is so cool! I have heard of finger knitting, but have never seen how it's done. This is a wonderful project.

    ReplyDelete
  7. this is awesome. we've been "getting around" to the hula hoop weaving for some time - the hoops are even in the living room, WAITING for us to finish up some other projects. and NOW i know what to do with all of that finger knitting! you are BRILLIANT!! my 6 yr old is ripe for this type of project - the knitting and the weaving (our chair backs and bannisters are constantly being woven with all sorts of ribbons, yarns, shoelaces...) thank you!!!

    ReplyDelete
    Replies
    1. Debbie, thank you so much! I'm thrilled that you are looking forward to trying the project. good luck!!

      Delete
  8. It's beautiful!
    Love the colours!
    Pinned it.....

    ReplyDelete
  9. Looks wonderful. About how many skeins of yarn did your project use?

    ReplyDelete
  10. Really my son used just scraps of yarn, except for that rainbow skein. A lot of it is going to depend on the thickness of yarn you use. I can tell you that that skein was 100 yards, before finger-knitting it up in single-finger knitting. I think the tan stripe is about 50 yards. I would say 500 yards of worsted weight yarn would probably do the trick - but if you do it from scratch with balls of yarn, let me know how much yarn you used. Good luck!!

    ReplyDelete
  11. It is beautiful. It looks like a lot of work, but SOOO well worth it! You have this beautiful art piece to hang and admire in your house, and you and your son made it. AWESOME! It will become a treasured heirloom (no pun intended haha!) some day!

    ReplyDelete
  12. Hula hoops are so versatile for the craft world, as they make a fantastic frame for any over sized project. After seeing this blog, I took my skill of making dream catchers and made an enormous dream catcher for a music festival I will be attending later on this spring. Thank you so much for the inspiration and I cannot wait to make one of these rugs! :)

    ReplyDelete
    Replies
    1. What a great idea for the dream catcher! good luck!

      Delete
  13. This is such a great project. I love how whimsical it is with all the different coloured/textured yarns.
    Silly question, but how doe sone do a signle finger knitting? Is that simply looping and knotting?

    ReplyDelete
    Replies
    1. It is just bringing the yarn over one finger pulling the bottom loop over the top loop - almost like single chain crochet over one finger. But, the rug would work with full four finger finger-knitting as well.

      Delete
  14. Thank you so much - I just couldn't figure it out from the very limited info at http://www.rockpoolcandy.com/sculpture/weaving-with-a-circular-l.html

    ReplyDelete
  15. Love this project. What is the paint on the wall behInd it?

    ReplyDelete
    Replies
    1. oh I love that paint. Its from so many years ago though. When I get a chance I"ll try to look in basement for the color.

      Delete
  16. Hiya - thanks for this project I cant wait to try it :D

    Just a quick question though - how do you connect different coloured pieces of finger knitting parts to form a ball?

    ReplyDelete
    Replies
    1. I just knotted the two ends together and then weave the extra lengths into the rug. Have fun!

      Delete
    2. Im completley new to knitting, so is it a specific kind of knot or does it not matter? :)

      Delete
    3. The kind of knot doesn't really matter as long as its secure. The knot will be hidden in the weaving. Try to make the two ends of finger knitting end up as close to each other as possible.

      Delete
    4. Cool, thanks :) - cant wait to get some yarn now :D

      Delete
    5. Brilliant! i am going to try it now:)

      Delete
  17. AS soon as I fouind this "pin" I went and bought yarn. I've never done ANY knitting, but I just sat down and made a 12 foot strand to start with! I'm hoping to be able to tie the ends together as nicely as you have. My husband is doubting my ability to finish the project (as I have a habit of starting things and giving up if they get too tough), but I think I've gotten the hang of it and cannot wait to get it moving along! Thanks so much for the great idea. I'm hoping to enlist the kids tomorrow as it's spring break and this will be a great way to keep them busy!

    ReplyDelete
    Replies
    1. Geez, sorry for the typos... my fingers may be worn out from the knitting ;)

      Delete
    2. Oh! you just made my day. Do stick to it and finish it because its just so satisfying and enjoyable. I hope the kids have a ball with it, too. Good luck!

      Delete
  18. This is amazing and I am starting mine as soon as I get home from work tonight! Does anyone have any suggestions about how to make a BIGGER hoop base?

    ReplyDelete
    Replies
    1. Shannon, I used a 28" hula hoop. You can find them up to 46" out there, I think. I would just look at your local store for the largest one you can find. You may want to use a men's x-large tshirt if you use a bigger hula hoop.

      Delete
  19. I'm confused to the step when you get to 7-9 inches? Why do you start going in between the loops? What exactly are you doing?

    ReplyDelete
    Replies
    1. Hi. Between 7 - 9 inches, you want to start going in between the loops to increase your number of weft strands (tshirt). Doing this provides the rug with more stability and structure. You basically double the number of spokes you are going over and under. Without it, the rug has less structure and would be more loosey-goosey, if you will.

      Delete
  20. This is awesome! it makes me want to go out and get a hula hoop just for this purpose! My knitting room is in an unfinished basement, and the concrete flooring gets a little cold on the tootsies now and then. I may have to make a whole whack of these!
    -Nicole
    Knit, Nicole, Knit!

    ReplyDelete
  21. Thank you SO MUCH!!! I helped my oldest daughter learn how to finger knit several years ago, I now have a very busy 7 year old that would just love a project like this. I think the only reason my older daughter gave up finger knitting was that we couldn't think of anything to do with the strands after she was done. I love this idea so much! I will be packing the kids into the car next month for a 20 hour drive and this will be a great way to let them "move" in the car while they are watching movies or listening to music and a great reminder of the trip when we put it all together. Thanks again!

    ReplyDelete
  22. Gorgeous. Thank you for the inspiration and excellent instructions.

    ReplyDelete
  23. Thank you for posting the instructions! It turned out lovely. I've been wanting to make a hula hoop rug but when I got to familyfun.com, they had taken the instructions off the site. Yours are much better anyway! :)

    ReplyDelete
  24. What a great idea! THANK YOU!
    My daughter is 5 and has one arm . . . this is a perfect project for her!
    I'm going to teach her how to finger knit today!

    ReplyDelete
    Replies
    1. I am so so happy to hear that. I hope that it goes well!

      Delete

I'd love to hear from you, please share!