


Day 21: A Bow Headband - a diy hair accessory

Whether they come on packages, or in hair, or lying down the back of a dress, ribbons and bows just hit that happy place for me – so pleasing. I can’t decide if its the shape, or the sheen, or just the promise of untying it at some point. Bows make everything seem a gift. I think the wrapped embroidery thread gives this headband an extra elegance. Take the bow away, and an embroidery thread-wrappped headband is a great accessory for a woman of any age. You add the bow, and you have perfect holiday party fare for the little girl in your life. 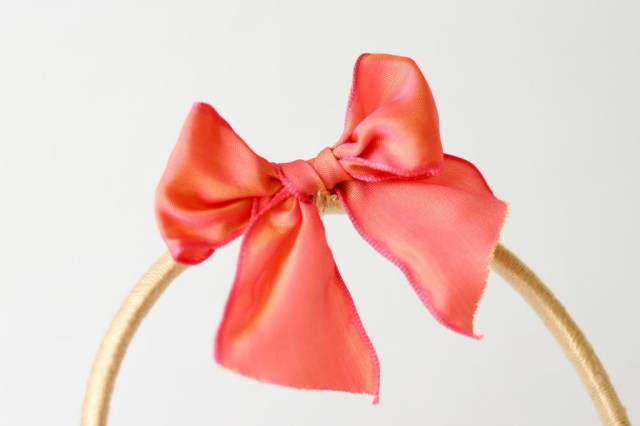 The gold sheen of the DMC 5 cotton pearl embroidery thread adds an extra sparkle to this.
 The gold sheen of the DMC 5 cotton pearl embroidery thread adds an extra sparkle to this.
This bow actually came from a pair that I originally made for barrettes, which I mentioned the bow bracelet post, going back to Day 2. But, I think they’ve added double the fun by being split and made into their own bit of fun. This tutorial takes a bit longer to make because of the thread wrapping, but it takes less time than you might think – so give it a whirl!

As always, click below or here for more glammy goodness:


Materials:
1 1/2" wired ribbon (apprx 18")
DMC 5 Cotton Pearl Embroidery Thread (1 skein)
Time: 1 hour
Headband with teeth worked for the Sparkle Headbands tutorial because the sparseness they caused the wrap to have ended up being hidden by the sparkles. Here, you need the no teeth headband variety, so the wrap looks smooth with great coverage.

Glue embroidery thread to the end of your headband.

Place some additional glue on the back of the headband and start wrapping. Adjust the wraps to look as nice as possible at the end. That’s the trickiest part.

Now, wrap away. Try not to overlap the threads, but have the lines of thread lie next to each other. I wrap a bunch and then compress them towards the beginning.

They should be snug, without space in between the thread.

Continue to the end, adding glue at the back of the headband. Finish by wrapping back up a few twists and gluing the thread to the back of the headband.
Make the bow:
Make two loops.

Cross the two loops.

Bring the right hand loop over and through the hole.

Grasp that right hand loop and let the tails flip over the top. The left hand loop will rotate. It should look something like this.

Tighten and loosen and play with it until it looks like you want.

Trim the ends at a diagonal.

Now, attach the bow to the headband by sewing around the headband and through the bow. I place the bow off center to end on the side of the wearer’s head. Catch some of the wrapped part of the headband as well so the bow stays in place.

Finish it off underneath the headband.

Finis!

Well, I showed the whole jewelry collection to the 11, 10, and 9 year old girl cousins we are staying with here in Utah. They said their favorites of all of them are days 22, 23, and 24. I’ve saved some of the best for last. I’m so excited to show them to you!
Leave a comment
This site is protected by hCaptcha and the hCaptcha Privacy Policy and Terms of Service apply.