


DIY Finger Knit Rope Trivet Tutorial

Mother’s Day is just around the corner! I thought this quick DIY Finger Knit Rope Trivet would hit the spot for an easy, yet beautiful project for the kids to make. Or, who are we kidding? Just make one for yourself! I have DIY kits in the shop if you want to get started right away!

I love the trivet’s simplicity and natural feel that the rope lends this project. The best part is that you can make the trivet in a jiffy, under a half an hour, with only rope and tape (to keep the rope from fraying)!

Trivets are so handy to have around and I love when a whole table of them coordinate at a party. How beautiful would a series of these in different sizes be strewn across a buffet. To make them, bigger, just finger knit longer or shorter strands than suggested in the DIY tutorial below.

The idea for the finger knit rope trivet has been floating around in my brain since I brainstormed finger knitting projects for my book almost three years ago now! I’ve always thought a finger knit rope trivet would be a perfect addition to the kitchen, but the project got dropped from the Table of Contents. Lucky for you, it didn’t drop from my brain ;)! I’m so glad to have a set of these in my kitchen to use now.
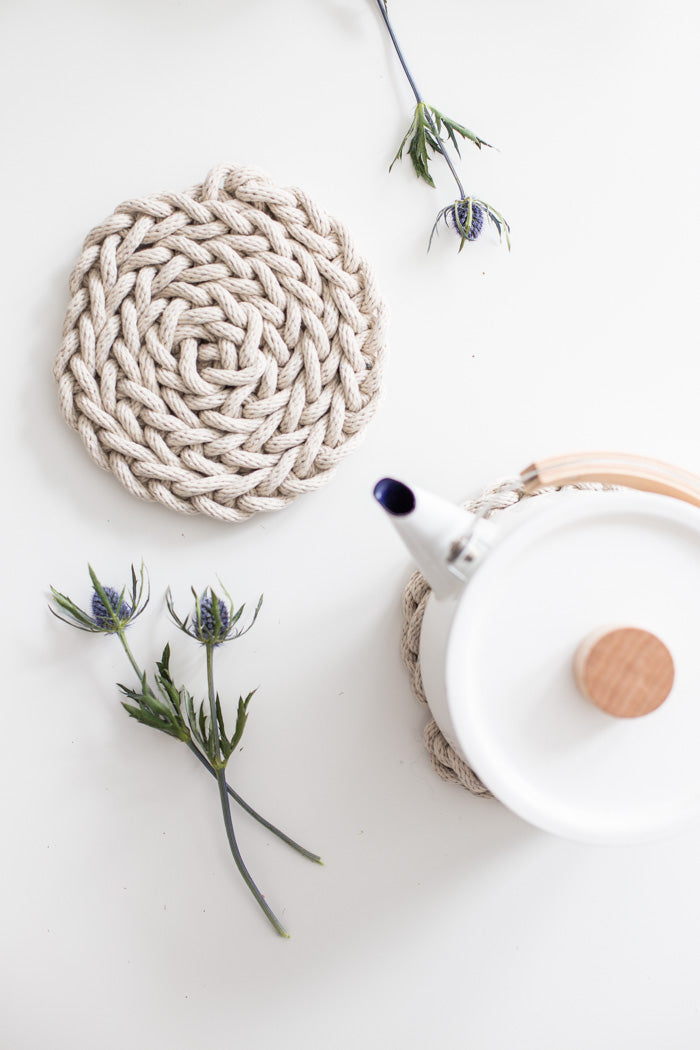
On a side note, and because I know you will ask, I love that this post allowed me to share my beautiful Kaico enamel cookware! The little milk pan and the tea kettle are the best! I think they are gorgeous. I adore their simple design, the white (of course), and the light wood. I’m trying to embrace the idea that I am inviting only things I LOVE into my home. These definitely fit the bill.
DIY Finger Knit Rope Trivet
Materials
10 yards 1/4" cotton sash cord
Packing tape

The trivet is made with two-finger knitting.
:: Leaving 8" of tail, wrap the rope over your fore finger, and under and around your middle finger.
:: Continue to wrap the rope under and around your fore finger, then under and around your middle finger. There should be two strands on each finger (including the tail).
:: Lift the bottom strand on your middle finger over the upper strand and off your middle finger.
:: Bring the tail in between you fore finger and middle finger (essentially over the upper strand on this finger and over your forefinger).

:: Next, wrap the rope around your fore finger again.
:: Then, wrap the rope under and around your middle finger again.
:: Lift the lower strand on your middle finger over the upper strand and off your middle finger.
:: Lift the lower strand on your fore finger over the upper strand and off your fore finger.

:: Continue with the above four steps, finger knitting approximately 55 rows. Finish the piece by cutting the end (leaving a foot and a half to the end) and bringing it under the loop on your fore finger and then under the loop on your middle finger. Pull the loops off your fingers and pull the end tight.
:: To assemble the trivet, bring the 8" tail at the beginning of the finger knitting strand through one of the strands of the fifth row of the finger knitting. Pull so the finger knit strand begins to coil against itself.
:: Coil the piece further (keeping the strand flat and not twisted) and feed the tail through the row of finger knitting directly opposite where the tail comes out of the first coil (through row 15 or 16).
:: Pull tight so the trivet continues to coil in a circle. The strand should be coiled tightly, though not so tightly that the coil starts to bunch.

:: Keeping the finger knitting strand snug up against itself all the way around the coil, thread the tail through the finger knitting again directly across from where the tail exited the last coil.
:: Coil one more time and thread the tail through the last coil and the end of the finger knitting. You want the end of the finger knitting strand to just make it to the tail so you can easily knot the ends together. This avoids a floppy piece at the end. If your finger knitting is too long for this, remove a couple of rows. If your finger knitting is too short, try coiling a little tighter or add a row or two. Pictured is the underside of the finger knitting. You can see where the tail has been threaded through each successive coil. Feed the rope from the end of the finger knitting strand through the trivet and tie a knot with the tail you threaded through the coil.
:: To finish the ends so they don’t fray, wrap clear packing tape around the rope about an inch from the trivet.
:: Cut the rope through the tape wrap. Weave the ends into the trivet.
I hope you love your new trivets!


Leave a comment
This site is protected by hCaptcha and the hCaptcha Privacy Policy and Terms of Service apply.