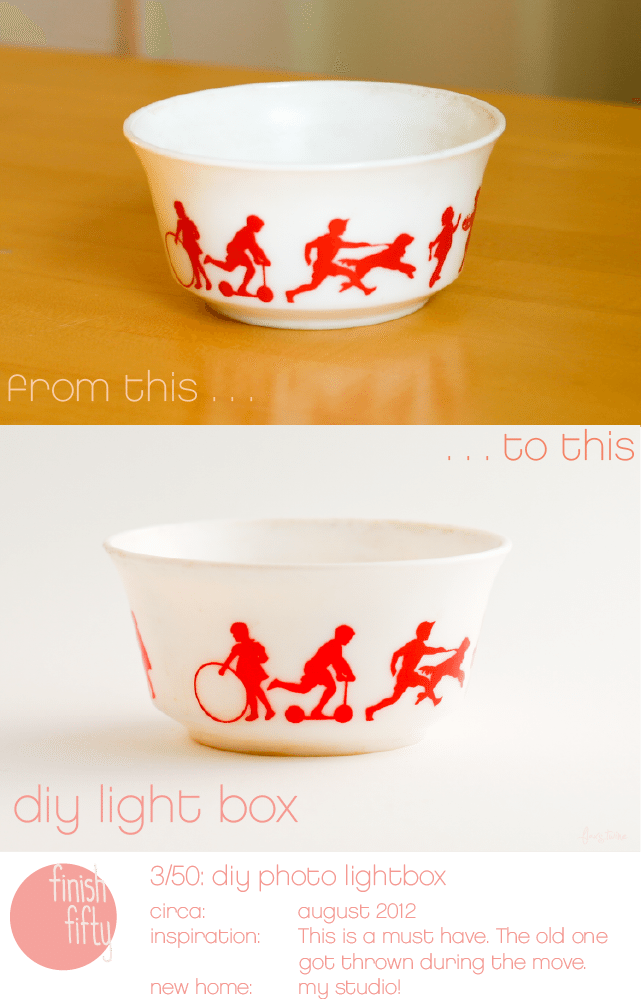
I first learned how to make a light box from Alessandra Cave, a beautiful photographer, from whom I took a great class at the Makerie, a lovely retreat in Boulder, CO. I built the first light box for my jewelry tutorials, 24 Days of Glam. Taking photos using the box seriously elevated the level of and look of this this blog as a whole.
My old light box had died a slow death in Boulder and was not worth moving. Making a new one landed on my Finish Fifty list the minute we walked in the door of our new house. I kept putting off building it, though. I tried to take photos every which way in an attempt to get good shots without it–a frustrating proposition.
The box is inexpensive to make. It’s simply a cardboard box, white paperboard and some tissue paper. My excuses piled up–I don’t have the right size box (um, hello, I just moved) or I couldn’t find the tissue paper, (again, with the move). But truly, the light box is so simple and fast to make and the impact on photo quality is SO enormous, I have no idea why I waited. So, here is project 3 from my Finish Fifty list along with a full tutorial. You can see complete Finish Fifty projects here.
Have fun with this!
DIY Photo Light Box Tutorial:
Materials:
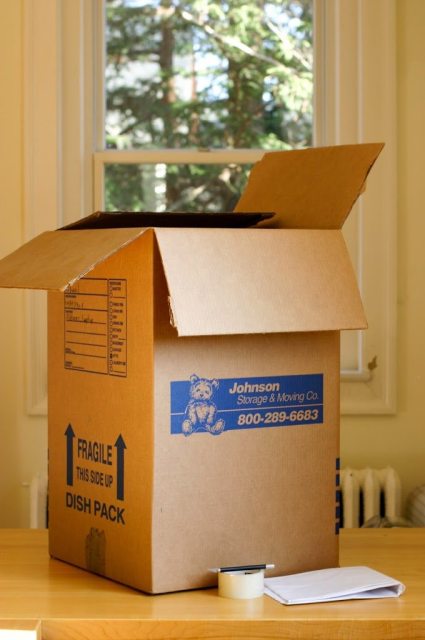
Cardboard box
Tissue paper
Craft knife
Packing tape
White posterboard (should be at least 30% longer than the box length)
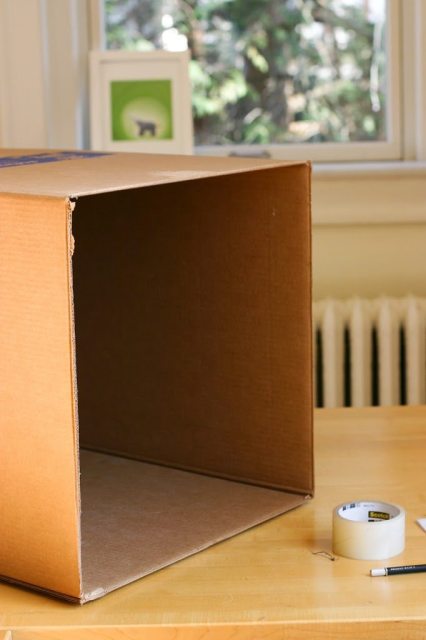
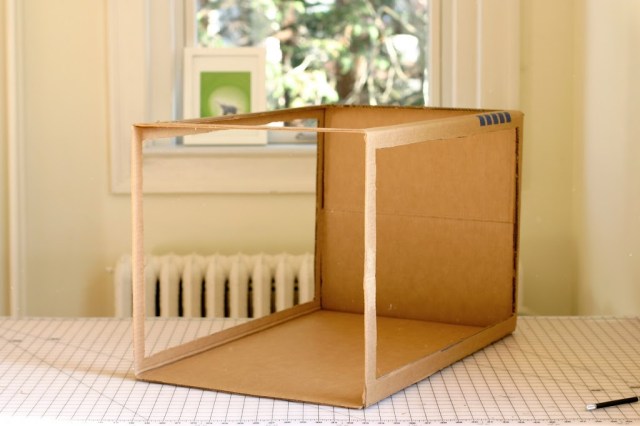
Cut off the tops of the box.
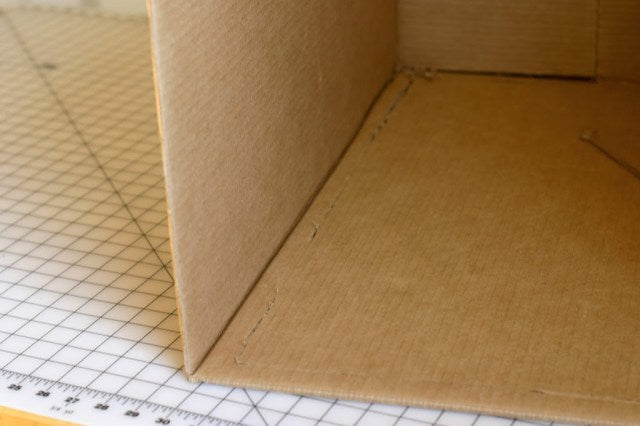
Pop out the side
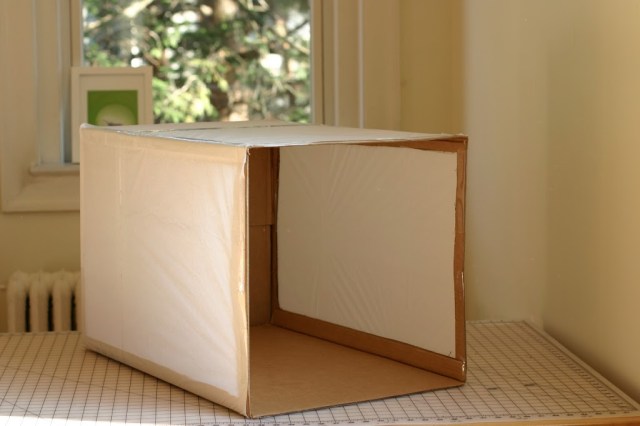
It should look like this after you cover all three sides.
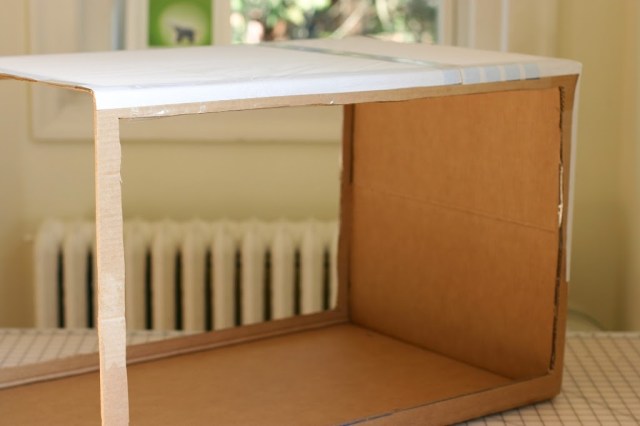
Cut white poster board the width of the box.
Place the poster board in the box such that it curves inside the box.

Cropped with a little brightening and voila!
Here is another side-by-side to compare. Before:
knit by nat says
Thanks for this DIY Anne! I can’t wait to make this!
Nat
anne says
Yay! Great Nat. Let me know how it goes. xx
bananaconda.net says
Great Design! I laughed out loud when I read this post. The font makes the a kind of look like an o. So I read “Thanks for this DIY Anne! I can’t wait to make this!
…Not.”
<3
Rheney Williams says
Oh man, this little thread just made my night! Sheer hilarity. I would probably cry if someone left that comment on my site.
But seriously, thanks so much for the tips, Anne! Unfortunately I’m left with some pretty low-budg looking pictures of my earlier work because they were gifts and thus, no longer available for reshoots. And even though I’ve since upgraded to the open window/full lighting shots, your light box technique will help take things to the next level. So thanks for helping me take my photog skills to 11 🙂
anne says
Thanks for your comment Rheney. I’m so glad that I could help!
Danielle @ Glitter Bug Blog says
Hi Anne,
I cannot tell you how happy I am to have checked out your blog and Whitney @ Elm Street Life to find DIY’s on how to get better photographs. It is one thing I am trying to improve on my blog and with my work in progress project I am so incredibly grateful for your help. Love the blog! and thanks 😀
anne says
Thanks Danielle. Make this light box! You will be amazed at how your photos look.
Real Live Woman says
What a great idea – it looks like it makes a huge difference. What kind of camera do you have, other than your iPhone that you’ve mentioned you use sometimes?
anne says
I use a Canon EOS Rebel. It is a very old camera body. But, my lens, which is a 50mm 1.8 fixed focal length, makes a huge difference in my photos as well.
sarah stevenson - redlinedesign® says
this was so awesome. I always have wondered how to make one…now I can…
Mama Pajama says
yaay, thanks!
Cindy says
love <3 thank you!
Meghan Elizabeth says
this is even easier than some I pinned a few days ago… I think I’m going to go put this together right now! Thanks 🙂
Acid Dreams and Sugar Highs says
This is fantastic, Thanks for the tutorial. I need to do this for my web shop 🙂 thanks
Kelli Michel says
Thank you so much for this tutorial! I have wanted to make one for a while but haven’t come across the right instructions. Now I have no excuse!
Loretta E. says
I love how simple this is! Now if I could just find a spot above destructive hands…
anne says
Yay! Thanks everyone! I’m glad you like this tutorial. It works so well – definitely take the time to do it!
Camille says
This is literally a revelation to me. (But no, I will spare you the joke about seeing the light.) :}
Anonymous says
Thanks for this great tutorial! I’ve seen some posts where they light from the sides – would you recommend that and if so do you know what kind of bulbs I can use to have the correct color/lighting?
anne says
I try at all times to take photo during the day when its sunny out. If you’re trying to do it at night, use at least three desk lamps with adjustable necks or clamp utility lights. Use at least 100W daylight bulbs. Orient a light through each window of the lightbox and take some test shots. Adjust the lighting as necessary. I still think they will come out better during the day in natural light, but sometimes you’ve got to work with what you’ve got! Let me know if you have any more questions.
Allie says
I never knew this was so simple! I’m often photography jewelry and I often photograph it on my wooden table but this would definitely be ideal!! Definitely a very worthwhile project so thank you so much for sharing! xx
Allie @ callmesassafras.wordpress.com
Anonymous says
How do you handle flash in all that white? It seems there would be a lot of glare in the photo.
anne says
It’s best not to use a flash at all. When you use a light box, all of your light should come in externally, either with daylight or artificial light pointed at the box from the outside. No flash . . .
Anna says
Genius! I will definitely be making one of these.
Anna
askannamoseley.com
Elizabeth says
Love this tutorial! So do you use the light box with or without lamps? I made a light box this past summer, but it didn’t work right. I’m not sure what was wrong with it, but there was always a really harsh shadow from above. I had a lamp on each of the three sides, played around with their position, but the harsh shadow was still there. I don’t use it much anymore, but I would love to be able to take pictures at night.
anne says
I try at all times to take photo during the day when its sunny out. If you’re trying to do it at night, use at least three desk lamps with adjustable necks or clamp utility lights. Use at least 100W daylight bulbs. Orient a light through each window of the lightbox and take some test shots. Adjust the lighting as necessary. I still think they will come out better during the day in natural light, but sometimes you’ve got to work with what you’ve got! Let me know if you have any more questions.
Holly says
What a great tutorial – thanks for sharing! 🙂
Lollie ~ The Fortuitous Housewife says
So thrilled I spotted your light box tutorial pin on Pinterest!
I’ve been meaning to make myself a light box, but hadn’t even gotten around to searching.
Gonna make myself one ASAP. Thanks so much for this great tutorial!
Stacey @ Newlywed Survival says
I have a light box that my husband purchased for me on eBay, however I hate moving it around the house…we use it in the basement for eBay photos, but I like to take my blog photos in natural light upstairs. I should make one of these – looks so easy – thanks!
Jaela Lopez says
Omg! I’ve been looking for something like this for the longest. Thanks for sharing awesome tutorial.
craftycitizen says
I only wish I could figure this out! It’s the lighting that messes me up!
anne says
I still think it’s better to do it during the day. It is tough to get the lighting just right. . .
Samantha Livesay says
Making a bigger version of this this weekend to take pictures of my cakes!Thank you so much!
anne says
brilliant! I hope it works out well!
Dakotapam says
This is great! I’ve been trying to improve my photos and this may be just the thing! And hey. . .I’m a blogger. . .I have boxes laying around for sure! The trick will be to keep the twins from treating it as a dollhouse.
anne says
yes, sometimes its hard to keep the kiddos away!
Flaming Nora says
Fab tutorial, thank you!
Beau Jour says
Honestly the best idea I have ever seen. I was just about to hire someone to take photos for me because i didn’t have a Photo Light Box. Now I can save myself some money. EXCELLENT!!!!!!!!!!!!
thenotsosecretlifeofbee says
Loved this tutorial! I made my own and love it! I linked back to you from my blog! http://thenotsosecretlifeofbee.wordpress.com/2013/03/07/2347/
Magie Amada says
My daughters and I will definitely be doing this project. They love to take pictures and this just makes them pop.
LeeAnn@Encouragement Is Contagious says
So cool..thank you for this tutorial. I’m going to make one of these so I can take better photos of my items in my etsy shop.
Mr. Fitz says
Knew what it was in theory, but never saw the step by step. Thanks.
John says
For more about lighting with box like this, see David Hobby’s excellent tutorials:
– DIY $10 Macro Photo Studio: http://strobist.blogspot.com/2006/07/how-to-diy-10-macro-photo-studio.html
– Using Macro Studio with Two Lights: http://strobist.blogspot.com/2006/08/on-assignment-shoot-your-shiny-new.html
He uses electronic flash, but same techniques work with any kind of light — spring-clamp reflector, goose-neck desk lamp, etc.
anne says
thanks john for those resources.
Graeme Cameron says
Just made mine – cost £0.14, took 10 minutes and the results are fantastic! Thanks Anne!
anne says
your welcome graeme! So glad it worked out well.
Anthony Bullock says
Totally gonna make this! This will be useful for my digital photography class and personal projects.
anne says
You’ll love it.
polly conway says
Thank you so much! This is the most do-able lightbox project I’ve seen, and it’ll fit into my tiny studio!
anne says
Yay!
Laurie2000 says
Thank you, thank you!! Just made this. Had everything on hand. It is awesome.
Leanne says
I haven’t been motivated to photograph my jewelry because I didn’t have the right setup, thank you so much for the tutorial! I just made one and can’t wait to use it!
anne says
Yay! so glad Leanne and Laurie!
Anonymous says
Thanks so much for this 🙂
Michelle says
Thanks for sharing! It’s an easy alternative to the poster board I have been using.
I’m hosting a giveaway over at my blog, so feel free to check it out and enter!
http://cloverandmustard.blogspot.com/2013/03/a-few-of-my-favorites-giveaway.html
Have a great week.
Peggy Williams says
Thank you Anne for this BRILLIANT Tut! I lost my expensive Lightbox when we moved and have been bummed. I’m making this one asap!!
PS: LOVE your blog!!
Vintage Rose Brocante || Vintage Vanille says
Super! I made something similar before but this is inspiring! ♥
Kathy says
This has made such a huge difference in the photos I add to my Etsy shop. It just makes them look more professional. You do still need to do some photo editing to make them pop but I love that I can capture the light and not have all the surrounding background competing with the product I’m trying to capture.
Cat Pope says
Great tutorial! I used a giant dryer box, and it works like a charm.
http://catpope.wordpress.com/2013/04/02/art-of-the-violin/
Starfish, darling! says
I use wax paper…it’s more durable. And if you don’t want to spend a buck on a roll of wax paper, save a couple of bags cereal comes in! It’s even more durable than wax paper!
anne says
great idea. I’ll admit that I’ve yelled at the kids once or twice (and myself) for popping a hole in the side.
Judi Fox says
We are hoping to make this really soon.
What was the poster board size that you bought for this project?
I have seen some white poster boards in the store, but I was thinking they might not be long enough for a dish pack box.
The instructions and photos are great to follow along! I will make sure to give you credit on my blog when I finish the box. I think this will greatly improve my photos! Yeah!!!
anne says
Hi Judi, the box length is 28″ and the poster board is 40″. I got my poster board in an art store where they have larger pieces. I’m glad you like the diy! You’ll be amazed at what it does to your photos! Good luck!
Anne
Sam says
Thank you so much for this tutorial. My pictures are turning out great!
anne says
Yay!!
Kt says
I’ve been putting off buying an actual photo light box for my new website because of the cost. Now I have no excuse to procrastinate and hot finish my website! Thanks for the extra push!
Kelsey says
Just did this DIY and the pictures look amazing! Thank you so much!
Esarpee77 says
This is really great, and it is so well done so that every one catches it.
thanks for this wonderful idea like to see more of them
Laura @ The Rookie Cook says
Oh my gosh- this is incredible and looks so easy to do! (Even for a non-DIY woman)
Now to find a box… 🙂
The Natural Soap Emporium says
Oh I LOVE this idea – thank you so much!! I’ve been struggling taking photos of my soaps but thought a light box cost a fortune – LOVE DIY!!
Jamie says
Perfect instructions! thanks
Anonymous says
Perfect! Thank you!
Myrachael says
I finally made this last week and it turned out awesome! I ended up using tracing paper since I ran out of tissue paper and it worked great! I’m so excited to use it now. Thank you for this amazing tutorial!
Sharmina Zaidi says
Wish I’d seen this before my husband spent the money on a “real” one. I have a question, though: What kind of lighting do you recommend using. My husband has a watch business and I’ve tried to take photos for him, but they aren’t that bright and if I use the flash, I get a shadow.
anne says
Don’t use a flash. I almost always use daylight to take my photos. But, if you are going to take photos at night, I use 100W daylight bulbs in gooseneck desk lamps. I orient the lights one on each side and one coming down from the top.
Anonymous says
Small biz guy here…often put up photos of product for customers to peruse. But I’m soooo not a photographer. My pics come out way better now, and it’s made sales a lot easier (which rocks, cuz I’m not a sales guy, either….)
So just one more thank you, but in this case your lightbox is helping me collect portraits. Of dead presidents 🙂
Kristy says
Thanks for this Anne! So helpful! Now I can make my products look amazing.
The Crafty Laydee says
Hello there,I have just put a link to this fabby tutorial on a Blog friends page so she can come and have a look-I hope that was ok,great tutorial you made thank you 🙂
Best wishes,Nessa xx
Caila says
This is FANTASTIC, thank you!!
Charles Flaum says
Beautiful idea!
Lok says
Thanks Anne!This is a great and easy tutorial.I made some photos instantly;) http://peravirens.wordpress.com/2013/10/01/diy-photo-light-box/
anne says
Stopped by to see. So glad it worked well for you!!
Anonymous says
I made this today after a quick trip to the dollar store for some poster board and tissue paper. It worked like a charm! I ended up using a serrated kitchen knife to cut the holes from the sides, because I am lacking in a lot of “professional” tools, but I made it work with what I had, and it made my product photos look professional and beautiful. Thank you! 🙂
anne says
I am so glad it worked well for you. Thanks for taking the time to leave a comment! Happy photographing!!
Rebecca Westerfield says
Thank you so much for this tutorial! Made one, took the picture which look great as is! Can’t wait to upload and edit. This will make photographing my jewelry for my etsy shop so much easier, thank you!
anne says
great! I’m so glad it is working for you!
Charles Flaum says
Simple to watch it and difficult to create photography!
anne says
Yes, it is difficult. I think so much of it is practice, practice, practice!
Jess says
OH my gosh, thank you so so much for this tutorial. I made it this morning and what a difference in my photos! Thank you thank you!
Nikki C says
Looks great! I will have to find a box in a few minutes… haha.
anne says
🙂
kReN says
Can you tell me the dimensions of the box? I can’t tell from the photo. Thanks!
kren dot kurts at gmail dot com
Jessi says
Found this so helpful! Thanks for sharing 🙂
Kimberly Miller says
Thank you so much for sharing this tutorial! I’ve made two different sized light boxes to fit my needs, and I shared my how to post (including a link to this particular post of yours) over at my blog: thenostalgicnightingale.blogspot.com!
anne says
Your welcome, Kimberly! I’m so glad you had a chance to make one!
VH says
This is FANTASTIC. I run an Etsy shop & all of my photos of my items have always been so…. sadly common? Is that the best way to put it? I mean, you see my living room in the background. Or my crappy couch blanket. Or leftover coffee cups that have yet to be washed. This light box was PERFECT for my need to step it up in the photos department… just had a bunch of orders I shipped but I photographed the crap out of them before boxing up!
I found it key to brighten/adjust contrast in Gimp (what I use to edit photos) after my shoot, however, as my home office does not get direct sunlight the way I’d hoped. Still, a huge improvement from my previous attempts!
(And, in case anyone cares, my shop is here: https://www.etsy.com/shop/N3rdWool…. and an example of one of my SUPER CLASSY photos can be found here: http://farm4.staticflickr.com/3697/11121291365_aa54fc06aa_c.jpg)
Long story short… THANK YOU.
anne says
Thanks so much for sharing! Yay.
StacieinAtlanta says
Best tutorial ever. I am making it tomorrow and I am so excited.
anne says
Thanks so much Stacie. Good luck to you!
Antionette Blake says
I made one last year and silly me always forget to use it – thanks for sharing!
anne says
Your welcome, Antoinette. Happy shooting!
James Bond Bond says
This comment has been removed by a blog administrator.
Kiersten Stahl - Parties and Pastries says
Thank you so much!! I just made this lightbox this morning (after putting it off for months:) ), and it turned out perfect! Thanks for the step by step instructions! Can’t wait to start taking pictures!
anne says
Thanks so much for your comment Kiersten. Isn’t it funny how we can put something off for so long, then when you do it – it seems a breeze :). Have fun with it!
Anne
Paru Mahtani says
Thanks so much Anne. I will definitely try this. I find it hard taking pics with my 50mm 1.8 lens though. i always end up with mu 18-200 lens…any tips?
anne says
Your welcome Paru. I think it depends what you are taking photos of. Are you trying to use it in the light box?
hasan hosin says
This comment has been removed by a blog administrator.
hasan hosin says
This comment has been removed by a blog administrator.
Yolanda Chambers says
I just saw this and it is brilliant. I want to post quality pics of my product on my website, but the lighting and background never seemed to work. I will try this weekend. Thank you for this simple, brilliant idea!
anne says
Your welcome! Mine is so loved its time for me to make a new one!
Mickey James says
Hi, having read this awesome written piece I’m also pleased to fairly share my familiarity here with colleagues.
Mickey James says
These blogs are quite incredible that have provided the best knowledge.
moving boxes washington dc
Micheal Hussey says
This comment has been removed by a blog administrator.
weaves says
Just the best idea. Made one tonight for taking pics of my books for my website. Thanks!
anne says
Your welcome! I’m glad that you found the tute!
bubble gum says
Your articles and blogs are inspirational.
id card says
Waooow!! Nice blog, this will be greatly helpful.
fabrilor says
Heya i’m for the first time here. I came across this board and I find It really useful & it helped
me out a lot. I hope to give something back and help others like you aided
me.
flaxandtwine says
Thanks so much! I’m so glad that it was helpful!
Julia says
I just found this, and how refreshing to find an expert tip tutorial that actually works…. Kudos to you Ann, and I’ve added you to my Pinterest … keep up the good work, and I love your site ! All the best…
flaxandtwine says
Julia,
Thanks so much! I appreciate your stopping by and leaving such a nice comment! Warmly, Anne
Style Bits & Bobs of M.E. says
Thanks for sharing. It is east to follow. I will have to try it soon!
Andrea Sánchez says
Hi!! THANKS SO MUCH FOR THE DIY!!! a quick question… do u put the box under natural light or what do you use to light it? THANKS SOOO MUCH FOR UR HELP!
flaxandtwine says
I still like to use natural light but you can use artificial light. There are details about bulbs and types further up in the comment section.
Jillian Hinton says
Thanks for your post! Made one this afternoon.. can’t wait to put it to good use! 🙂
Linds says
Excellent project!
Sandra Ellzey says
Thanks for this excellent tutorial. I was able to make it quickly during my lunch break, and I already tested it out.
-Sandra
flaxandtwine says
Thanks so much Sandra!
Bing says
This is so cool. Thanks for sharing. I really need to make one. for my blog 🙂
Coolio says
This is awesome! I love photography so this is the best thing ever!!!!!!
Xoxo Tammy
Madeline says
Stumbled upon this searching pinterest. This is the GREATEST solution for my small business! I’ve looked for many different options, and this one is by far the best. I might consider doing a thin white fabric instead of tissue for more lasting durability. What do you use for lighting?
flaxandtwine says
Hi Madeline, great idea for the fabric. Mainly, I shoot with natural light. When I have to, I use gooseneck lights with 75 -100 watt bulbs until I get the look I want.
Good luck!
AlamHati says
thank you for sharing. easy to do
Bernadette says
Thank you so much for this! I’m a newbie photographer and I totally appreciate this idea!! 🙂
flaxandtwine says
Your welcome Bernadette! Have fun!
Ashley says
Now this is a great DIY tutorial! Thank you for great step by step pictures. I am definitely going to be making a light box out of one the many boxes in my basement from moving.
flaxandtwine says
Thanks so much Ashley! Good luck – and happy shooting!
frontpoint review says
The quality of information that you are providing is simply marvelous.
Laryssa says
Fantastic idea! All the needed materials are right on hand, except maybe the poster board. Do you have any ideas for a substitute?
flaxandtwine says
do you have white butcher paper? You could wrap a piece of cardboard if the paper is large enough to be seamless . . .
Susan Schade says
Awesome, this is just what I need. Thanks so much Anne!!!
flaxandtwine says
Your welcome Susan!
Tiffany says
Boy, am I glad I found your post! Where I live, we don’t have photography equipment easily accessible to purchase, so this is exactly what I needed. Thanks x100000 for this! Pinning it ASAP!
flaxandtwine says
Oh! Yay Tiffany! Thanks so much for finding it and pinning, of course!
norma's bath says
Great, Great, Great Tutorial! thanks.
Mike Garcia says
I made something similar , used white shower curtain for sides worked like a champ !
flaxandtwine says
Great idea for the shower curtain. My tissue paper breaks sometimes and it drives me nuts 🙂
Asha says
Thank you so much for thus tutorial!!!!! I have been looking for a way to produce better photographs for years! Thank you thank you thank you!! I love my new light box.
Sudduf says
I just made this lightbox yesterday and am SO excited to get started with it. Do you shine light on it from a certain angle? What’s the best place to shine light on it? Or is daylight best?
Thx!!
flaxandtwine says
If I use lights, I use three goosenecks (just regular bulbs), one from the top and one from each side. But really, I like daylight the best!
Free says
This is great I will be doing this real soon. Thanks for sharing.
Kari says
Thank for the diy! I made one of these last year and still love it!
I’ve linked up this post on my blog 🙂
Thanks!!
http://loveandfarkles.blogspot.ca/2015/04/behind-scenes-at-love-and-farkles.html
flaxandtwine says
Hi Kari – lovely post! Thanks so much for coming back and leaving a comment and sharing your link. Beautiful jewelry and the most perfect photo studio I could imagine! xo
Rebeccah says
Thank you so much for this helpful tutorial!! There are so many similar projects out there, but yours made it simply and (FINALLY!) motivated me to actually build it today! Still in need of some poster board or seamless paper to complete it, but at least I’ve got the structure down. Can’t wait to see how it elevates my blog photography! Thank you again! 🙂
flaxandtwine says
Your welcome! Thanks so much for taking the time to write and thank me! I’m sure your blog photography will be crazy good now!
Lucy says
Thanks for this. I’m going to have a go at making one today! 🙂
flaxandtwine says
Yay, Lucy! Have fun!!
Janet says
This is absolutely amazing! I’m so excited I think I’ll go make one right after dinner! Thanks for sharing this simple and cheaper alternative than spending the money I don’t have for professional photography items.
Andry elhaqq says
I think this is a cost-saving alternative, I like the way that is simple yet has outstanding results, I think with using old cardboard with a size of 30 X 40 centimeters is ideal to create a lightbox, because the object that is normally used is not too big. This article inspired me to write useful content for my website, I have also been bookmark this site so that i can get useful information anytime, and anywhere. Thank you, still share something useful about the world of photography!
Shumi says
Its looking really easier for me to make it by myself. If I can make it myself I would be so happy! Thank you and I am going to follow your instruction!
Deneen says
Thank you so much for posting this DIY light box tutorial! I have procrastinated long enough & must do this. I do have a question. The use of tissue paper around the cardboard frame reminds me of an opaque plastic (Rubbermaid or Sterilite) box container. Do you think that would work in place of the cardboard box frame (with the curved, white poster board insert installed, of course)?
flaxandtwine says
I think that’s a great idea to try. It might not be opaque enough but it certainly would help it be more sturdy. You should try it!
Rhiannon says
Love this guide – have just made my box following your instructions. Looking forward to trying it out soon!
Anneliese says
This idea is ingenious – a great great thank you.
Jess @ Make and Do Crew says
I’ve seen these light boxes made before and now I’ll know how to create my own! Thanks so much for the tutorial.
flaxandtwine says
Your welcome, Jess! Happy shooting!
Emma says
This is great! I am going to try making this today so my pictures can start looking better. Thank you!
Juanita says
Good idea, thank you very much for this information! Can you tell me what kind of lighting did you use?
flaxandtwine says
Hi Juanita, Frankly, I like to use natural light. If you want to use artificial light, I use those gooseneck lamps with 75-100w bulbs. I use one from each side and one from the top.
Juanita says
Great, thank you very much and have a good week!
Nitin Sharma says
Awesome…I will definitely going to put on this. http://www.skugphotography.com/
Nahid says
thanks
JOE says
Anne,
You have mentioned taking pictures during the day light. Do you mean taking the pictures outside or in a well sun lighted room? If outside, what is the best part of the day? Direct sun light on the box or on an angle. Thanks for your time.
flaxandtwine says
I take them inside during the day in a well sun lit room. The tissue covers of the box should remove the shadows. Play with it to see what effect you like!
Rose Rolo says
Wow how awesome! I just bought a huge jewelry close-out for my closet on Poshmark. I’ve never sold jewelry so I was getting nervous about how much money I spent and not knowing how to get the proper pictures. I’m making this first thing tomorrow and I’ll let you know how it turns out. For sure it will be better than my present photo booth which is nothing, lol!
flaxandtwine says
I hope it goes well, Rose!! Good luck!
mamun says
thanks for posting.
flaxandtwine says
Your welcome!!
Rose Rolo says
Update: Made the light box last night. It took about an hour to make. Started taking my photos today and I’m beyond thrilled! My photographs look fantastic! It’s as if they were taken in a studio with professional lighting and equipment, not a $5.00 light box and a cell phone! This is really important to me since I am in business for myself and my income depends on it. Thank you so much!! XOXO
flaxandtwine says
Oh wonderful, Rose!! I’m so glad it went well and the box is working wonders for you. Good luck in your business!!
Nasrin says
I have no words to say. This was awesome.
Thanks for sharing such brilliant post.
Georgiana Veronica says
Something so simple and yet so useful! No words! Thanks for the inspiration.
flaxandtwine says
Hi Georgiana,
I’m so glad this post helped you!
Anne
Jarrod says
Thank you for the idea! I just built it and used it for my Etsy shop! The pictures look amazing. I used a blue poster board with a opaque/translucent poster board on top of the blue to give it an amazing fade effect. I can’t believe how professional the photos look. It really took my listing photos to the next level. (I know it might be a little hard to visualize what I was speaking about with the blue/opaque poster board, so if you head over to my shop you can see: LaurphenLiving.Etsy.com)
THANK YOU again.
-Jarrod
flaxandtwine says
Oh wonderful! how cool! Thanks so much for giving it a whirl. I’m glad it’s improved your photography. Thanks for sharing your tip, too!
Monica says
Thank you for the idea! Very good collection of designs.
David Fowler says
Made it this morning and well pleased with the result! Cost me £1.70 for the poster board, I’d already got everything else. The only thing you have to be careful about is cutting the holes when 1 or 2 have already been cut. I found the box wanted to collapse a bit. Still, going at it slowly sorted it out.
flaxandtwine says
I’m so glad David! Yes, posterboard would be a little floppier than a cardboard box. I’m so glad it worked out!
Corinne Carey says
I would like to make a light box, but something much bigger. Will have to see how well I can scale this up to fit something like a full-sized mannequin
Sapon says
I would like to thanks because your tutorial is helpful for my website.
Tara says
What do y’all recommend for light when shooting in the evening? It’s been getting dark around 5pm 😣
Brittaney says
Thank you SO much for the clear explanations and photos. Most DIY light box tutorials are so complicated and lengthy. I’m so excited to make this!
flaxandtwine says
You’re welcome! I hope it helps you!
Charles Clinton Rodrigues says
WOW!!! NICE!!! i am going to try this for sure!!
Thanks for sharing the idea.
Ryan Chapman says
What an amazing DIY of photo softbox or lightbox. Thank you for sharing your creative idea. It’s very important for product photography.
Clipping World says
Photo Light Box Is the great photography style, We love the style . Thanks for your tutorial.
After see your tutorial I try myself and 100% results.
Thanks a lot again
Caylie says
Do I have to use white tissue paper? Can it be a light blue or something? I don’t have any white, but still want to make it.
flaxandtwine says
Hi Caylie,
You might as well try it with blue. My worry is that it may give your photos a blue tint. BUt maybe it will be neutral if you use yellow light.
Anne
Caylie says
Thank you! I will try it
Alex says
Amazing post. DIY light box is extremely heplful for professional product photographers. You made it easily. Thanks for sharing your ideas.
Moslem Uddin says
I made this today after a quick trip to the dollar store for some poster board and tissue paper. It worked like a charm! I ended up using a serrated kitchen knife to cut the holes from the sides, because I am lacking in a lot of “professional” tools, but I made it work with what I had, and it made my product photos look professional and beautiful. Thank you! 🙂
flaxandtwine says
You’re so welcome. I’m glad it worked out for you.
Lisa Smith says
Anne, thank you kindly for your easy-to-understand light box tutorial! I am disabled and needed to figure out a way to take photographs from my bed, but our home has abysmal indoor lighting. This sounds like the answer! I read through all your additional information in the many comments you’ve received, so I am ready to ask my patience husband to get building! Thank you again for such a wonderful, inspiring project, Lisa