Finger Knitting Hula Hoop Rug DIY
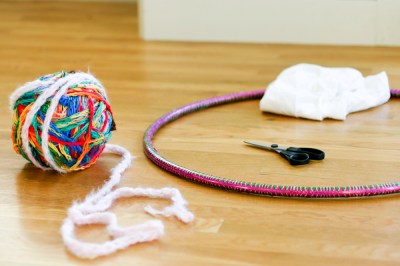
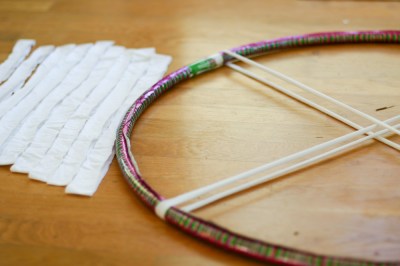
Cut the t-shirt into 10 strips, approximately 1 1/4″ wide across the body of the t-shirt, under the arms.
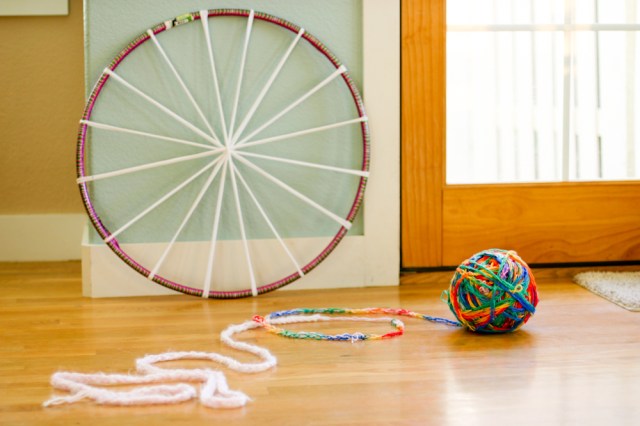
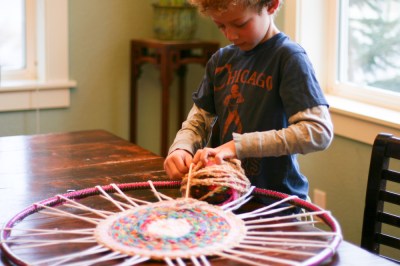
Pull the strips across the hula-hoop in a spoke pattern, going progressively in between the spokes you’ve already added.
After adding the 10 strips stretched across the hula-hoop into 20 spokes, you’re ready to start.
You need to create an odd number of spokes to make the weaving pattern (over/under) work. Do this by pushing two of the spokes together. Even out the spacing on rest of the spokes across the hula hoop.
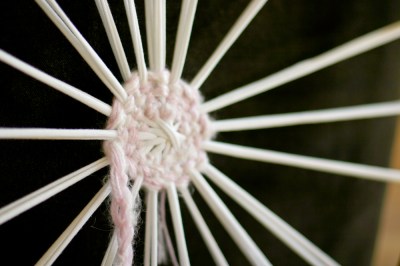
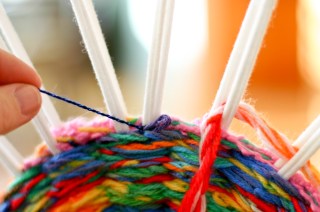
If you have an extra large ball of finger-knitting, you’ll have to squeeze the ball in between the spokes and re-space them afterwards. Every time you get back to the double spoke, check to make sure you haven’t missed any, you should be doing the opposite (over or under) of what you did on the last round.
They quickly got a hang of pulling the ball over and under the warp spokes and noticed quickly if something got off.
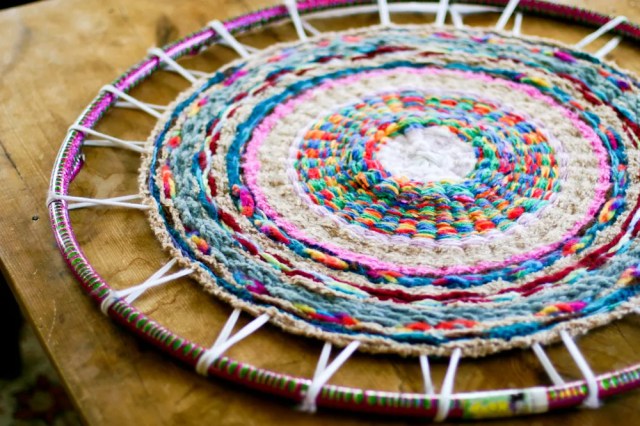
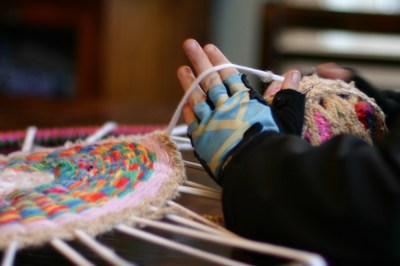
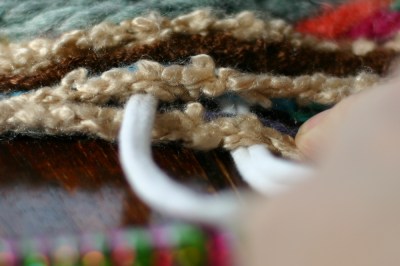
We found it easiest to do a bunch of weaving (over/under) in a row, as below, and then to pull the finger-knitting taut (not too tight!), such that it fits snugly against the circle.
I think the ball of finger-knitting was made for this hula-hoop, because it fit just perfectly. We wove until the ball was gone! Generally, you want to stop about 4 inches before the edge of the hula hoop.
You want the ties to be fairly tight because if the rug starts to loosen, it will start to curl into a bowl.
Continue to cut and tie each spoke as you go around.
When you get to the double spoke, cut it, and then . . .
. . .take one of the pieces of the double spoke and re-weave it over and under some of the finger knitting strands next to it, and then tie.
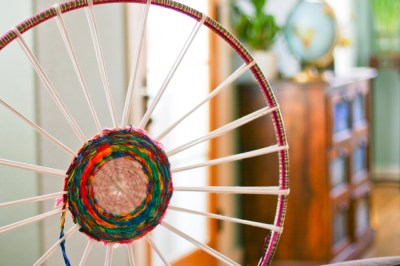
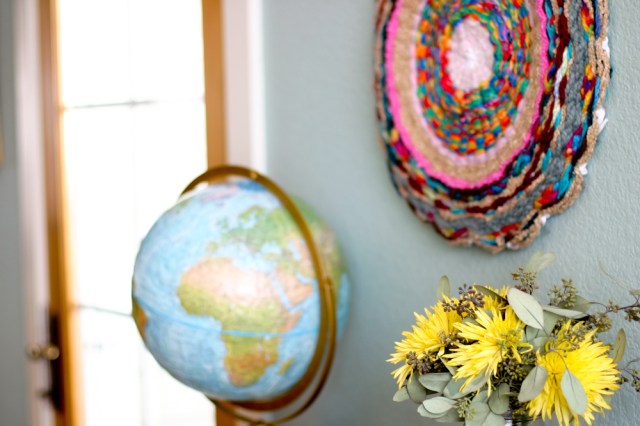
Voila! Finis. It’s slightly counter-intuitive, but if the rug is curling. Push the weft (finger-knitting) in towards the center of the rug and re-tighten the ties. This way the circumference of the circle is smaller and the strips of finger knitting won’t be pulling as much. You can leave the rug with the ties loose as below. I think this makes a striking center piece.
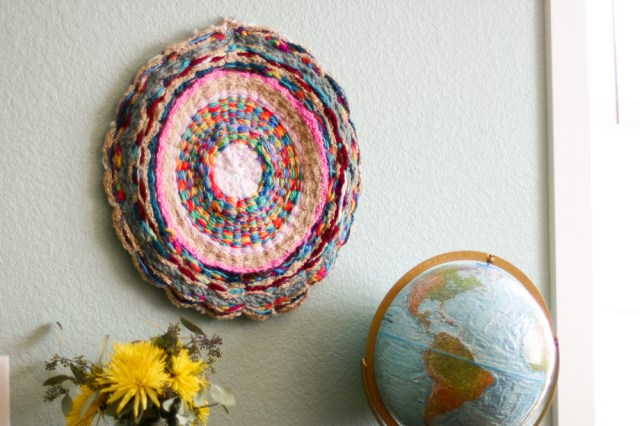
Or, to hide the ties, as in the first photo in this post, I chose the “right” side of the rug, by choosing the side I thought looked the nicest. I flipped the rug to the “wrong” side, and wove each piece of the tie into the back of the rug.
The back of the finger knitting hula hoop rug looks like this with the ties woven in:
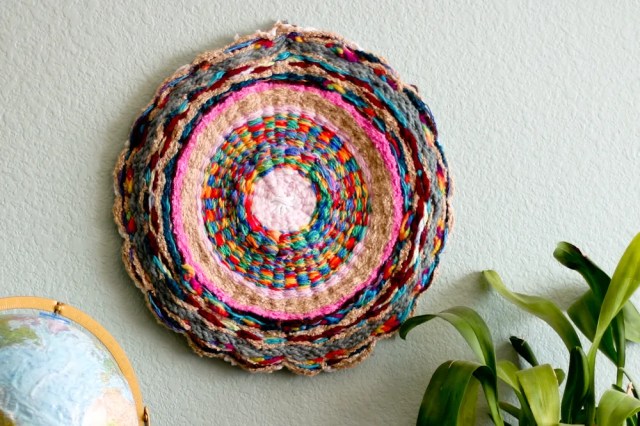
The front of the rug looked like this:
Phyllis says
If I could hug you, I would! I have been wanting to do this very thing when I saw that project in Family Fun. I just didn’t have the nerve to use something different (yarn fingerknitting) instead of more t-shirt cloth. Thank you for showing me that it can be done! You are fab!
anne says
hugs right back at you Phyllis! so glad you’re going to give it a go. It was really quite simple, even though the hula hoop seems intimidating. Report back!
Angela says
Just started one. Such a fun thing to work on. A good focus tool and stress relief!! Thank you for your easy to follow tutorial. I used cotton string instead of tee shirt so I will get inventive at the end with tassels or something since I can’t tie them together. Thank you!!
cathy says
unbelievable – I absolutely love this – somewhere in my files I have a picture of this huge rug (maybe from anthropoplogie) and it was absolutely beautiful and just like yours – the only BIG difference is the price – I am so going to do this and thank you for taking all the time to share this with all your photos and stuff – you’re terrific!
anne says
So glad to hear it cathy. Let me know how it goes!
Alessandra says
WOW! WOW! WOW! WOW!
Compliments to the little knitters, too!
Love, xxx Alessandra
creativejewishmom/sara says
Fabulous project, been wanting to do it too. Infact I’ve got some hoola hoops out for another project, but maybe we’ll do this instead. Using the finger knitting is such a wonderful idea, as is doing it bit by bit. I’d love it if you’d join my linky party, Craft Schooling Sunday, always looking for some quality crafters to join us! And by the way, I did a little weaving project with my kids with t-shirt yarn a while back that you’ll certainly like: http://www.creativejewishmom.com/2010/06/weave-fun-summer-placemats-with-tshirt-yarn.html
icolorart says
anne, love it! i see a weekend project coming our way. what do you think about using bulky yarn in lieu of the finger knitting??? so happy for all the creative success that has been coming from you. hope it is nourishing your soul.
anne says
Thanks so mucy – I think super bulky yarn would work really well. Might take a bit longer but would make a beautiful rug. Nourishing my soul is right – its good to remember that and be thankful.
Angela says
This is so cool! I have heard of finger knitting, but have never seen how it’s done. This is a wonderful project.
debbie says
this is awesome. we’ve been “getting around” to the hula hoop weaving for some time – the hoops are even in the living room, WAITING for us to finish up some other projects. and NOW i know what to do with all of that finger knitting! you are BRILLIANT!! my 6 yr old is ripe for this type of project – the knitting and the weaving (our chair backs and bannisters are constantly being woven with all sorts of ribbons, yarns, shoelaces…) thank you!!!
anne says
Debbie, thank you so much! I’m thrilled that you are looking forward to trying the project. good luck!!
OnePerfectDay says
It’s beautiful!
Love the colours!
Pinned it…..
Anonymous says
Looks wonderful. About how many skeins of yarn did your project use?
anne says
Really my son used just scraps of yarn, except for that rainbow skein. A lot of it is going to depend on the thickness of yarn you use. I can tell you that that skein was 100 yards, before finger-knitting it up in single-finger knitting. I think the tan stripe is about 50 yards. I would say 500 yards of worsted weight yarn would probably do the trick – but if you do it from scratch with balls of yarn, let me know how much yarn you used. Good luck!!
Carolyn says
It is beautiful. It looks like a lot of work, but SOOO well worth it! You have this beautiful art piece to hang and admire in your house, and you and your son made it. AWESOME! It will become a treasured heirloom (no pun intended haha!) some day!
Meg says
Hula hoops are so versatile for the craft world, as they make a fantastic frame for any over sized project. After seeing this blog, I took my skill of making dream catchers and made an enormous dream catcher for a music festival I will be attending later on this spring. Thank you so much for the inspiration and I cannot wait to make one of these rugs! 🙂
anne says
What a great idea for the dream catcher! good luck!
Anonymous says
This is such a great project. I love how whimsical it is with all the different coloured/textured yarns.
Silly question, but how doe sone do a signle finger knitting? Is that simply looping and knotting?
anne says
It is just bringing the yarn over one finger pulling the bottom loop over the top loop – almost like single chain crochet over one finger. But, the rug would work with full four finger finger-knitting as well.
Anonymous says
Thank you so much – I just couldn’t figure it out from the very limited info at http://www.rockpoolcandy.com/sculpture/weaving-with-a-circular-l.html
Anonymous says
Love this project. What is the paint on the wall behInd it?
anne says
oh I love that paint. Its from so many years ago though. When I get a chance I”ll try to look in basement for the color.
Anonymous says
Hiya – thanks for this project I cant wait to try it 😀
Just a quick question though – how do you connect different coloured pieces of finger knitting parts to form a ball?
anne says
I just knotted the two ends together and then weave the extra lengths into the rug. Have fun!
Anonymous says
Im completley new to knitting, so is it a specific kind of knot or does it not matter? 🙂
anne says
The kind of knot doesn’t really matter as long as its secure. The knot will be hidden in the weaving. Try to make the two ends of finger knitting end up as close to each other as possible.
Anonymous says
Cool, thanks 🙂 – cant wait to get some yarn now 😀
anne says
Have a TON of fun!
Anonymous says
Brilliant! i am going to try it now:)
Anonymous says
AS soon as I fouind this “pin” I went and bought yarn. I’ve never done ANY knitting, but I just sat down and made a 12 foot strand to start with! I’m hoping to be able to tie the ends together as nicely as you have. My husband is doubting my ability to finish the project (as I have a habit of starting things and giving up if they get too tough), but I think I’ve gotten the hang of it and cannot wait to get it moving along! Thanks so much for the great idea. I’m hoping to enlist the kids tomorrow as it’s spring break and this will be a great way to keep them busy!
Anonymous says
Geez, sorry for the typos… my fingers may be worn out from the knitting 😉
anne says
Oh! you just made my day. Do stick to it and finish it because its just so satisfying and enjoyable. I hope the kids have a ball with it, too. Good luck!
Shannon says
This is amazing and I am starting mine as soon as I get home from work tonight! Does anyone have any suggestions about how to make a BIGGER hoop base?
anne says
Shannon, I used a 28″ hula hoop. You can find them up to 46″ out there, I think. I would just look at your local store for the largest one you can find. You may want to use a men’s x-large tshirt if you use a bigger hula hoop.
Anonymous says
You could always got to a hardware store and buy flexible plastic piping at the length you desire for your circumference and either duct tape it together into a circle or join it with one of the joints they sell for the purpose (I’d probably do both for stability). This is what I did when hula hoops were scarce on the ground last fall but my daughter wanted to be pac-man for Halloween. Can make it as huge as you want! And the piping was cheaper than a hula hoop anyway (If you do a google search for homemade hula hoops you can get the idea of how they use the piping and what kind they use for the right kind of sturdiness).
And I love that you brought this up because I was just thinking about how to make a huuuuge rug — this would be perfect! I imagine strips of t-shirt tied together would work as spokes, or another medium would as well. I did some mini-weaving with this technique several months back using lids to ice cream pints with the centers popped out and the cut off tops of giant canisters of oatmeal, and I used yarn as the spokes — worked fine.
anne says
Thanks so much for sharing these ideas. The piping sounds like a fabulous idea. I love the idea of mini rugs – I can see them in a garland, or hanging from the ceiling, like a mobile. beautiful!!
Anonymous says
I’m confused to the step when you get to 7-9 inches? Why do you start going in between the loops? What exactly are you doing?
anne says
Hi. Between 7 – 9 inches, you want to start going in between the loops to increase your number of weft strands (tshirt). Doing this provides the rug with more stability and structure. You basically double the number of spokes you are going over and under. Without it, the rug has less structure and would be more loosey-goosey, if you will.
Anonymous says
Thank you!
Nicole says
This is awesome! it makes me want to go out and get a hula hoop just for this purpose! My knitting room is in an unfinished basement, and the concrete flooring gets a little cold on the tootsies now and then. I may have to make a whole whack of these!
-Nicole
Knit, Nicole, Knit!
Anonymous says
Thank you SO MUCH!!! I helped my oldest daughter learn how to finger knit several years ago, I now have a very busy 7 year old that would just love a project like this. I think the only reason my older daughter gave up finger knitting was that we couldn’t think of anything to do with the strands after she was done. I love this idea so much! I will be packing the kids into the car next month for a 20 hour drive and this will be a great way to let them “move” in the car while they are watching movies or listening to music and a great reminder of the trip when we put it all together. Thanks again!
Blue Witch says
Gorgeous. Thank you for the inspiration and excellent instructions.
Anonymous says
Beautiful!
Debbie Z says
Thank you for posting the instructions! It turned out lovely. I’ve been wanting to make a hula hoop rug but when I got to familyfun.com, they had taken the instructions off the site. Yours are much better anyway! 🙂
Anonymous says
What a great idea! THANK YOU!
My daughter is 5 and has one arm . . . this is a perfect project for her!
I’m going to teach her how to finger knit today!
anne says
I am so so happy to hear that. I hope that it goes well!
Sophie says
Hi, i was just wondering… I’m giving this a go because i think it looks amazingggg!! But are you supposed to see the criss crossed t-shirt in the middle fo the weave? And if yea, what colour tshirt would you suggest?
Jeannetta says
Awesome! Due to the death of our daughter, her daughters are coming to stay for the summer; what a fabulous thing to do–finger knitting and then weaving, as we talk about mommy and life etc. The oldest is six, the younger three. They could have an awesome rug to take home to put between their beds. Thank you!
anne says
Jeannetta, This email touched my heart. What a beautiful thought and wonderful way to help your granddaughters “make” their way through their grief and loss. I wish you all the best!
Luella says
Awsome, I just learned how to finger knit but I think if I work hard at it I might be able to do it and have it look good.
Luella says
im only in middle school though
anne says
Luella – that’s awesome! It will look fabulous and be such a fun thing for you to have in your room. If you can, send photos so I can see! flaxandtwine (at) gmail (dot) com! Good luck!!!
Us! says
Fabulous! I have a ball of fingerweaving that looks a lot like your son’s! (I spent a season at a renaissance faire as a weaver, so I did a lot of finger weaving and taught a lot of people finger weaving!) Now I know what to do with the massive ball o’ yarn sitting in my closet!
anne says
Have fun with it!! YOu’d be amazed how much of it the rug uses up. Fun to see all the textures create the rug!
Debbie Covington says
Anne,
I am a girl scout troop leader. Could you tell me approx how many skeins of yarn it took to complete this and time taken? It is for a group of 9 yr olds. Have you tried it just with very thick yarn as well? Thank you in advance for any other additional ideas?
anne says
Debbie, Thanks so much for writing. It’s hard for me to say how many skeins of yarn as we did it all with scraps. My guess is that it would be about 1000 yards of yarn. That’s 10 skeins of 100 yard skeins. Some of the yarn in there is very thick, some is very thin. You could do it with a combination. I think it will be fabulous to have something the troop has woven together as a group. I’m so excited for you all. Best of luck. Read the instructions in detail so the rug doesn’t curl!
Charlene says
What a great idea! My girls (ages 9 and 7) have been wanting to make a t-shirt rug, but they like this idea much better! They took out all of our soft, thick yarn and just went to town. Thank you so much for the detailed instructions and photos – made it very easy to get started. We may use this idea for our Girl Scout troop too! Thank you!
schmithappens says
I like this idea so much. I tried to make the tshirt hula hoop rug from family fun and it did not go well at all. The kids gave up quickly and my hoop ended up not being circular anymore. I cant wait to try your technique instead. I will definately keep in mind a little at a time rather then the large ball. should work perfectly with my 9 year old who needs to keep his hands busy, my 13 year old might enjoy it too!
anne says
So glad you like the idea! Good luck with the finger knitting instead. I hope you and your kids enjoy it. xo
Tammy says
Thank You so much for this fun and creative project, the kids are going to love it. I have a very petite 4 yr old granddaughter and I think the big ball might be too much for her so I am going to have her try finger crocheting and then using an embroidery hoop in place of the hula hoop. I figure we will start small scale and progress from there. She will love doing that while the older kids work on the bigger scale.
anne says
Tammy, You are a great grandmother.
What a cool idea! let me know how it goes.
Anonymous says
Do you think it would work without first-finger knitting? What about a single strand of yarn or single thicker roll of yarn? Would one essentially get the same effect, just less thick?
anne says
Yes, you can do it without finger knitting first. The thinner the material, the longer it will take, but it will still look beautiful! Have fun!
Jada Li says
I did this and it was SOO fun! I decided that it was so fun that I taught a friend and we did it together. Spending our time talking and weaving!
anne says
Yay! So glad you guys tried it. Isn’t it fun?!?
Penny T. says
I think this is an awesome idea. Thank you for sharing this with us. I love your choice of colors. I love the rainbow color and was wondering what color and type it is, along with your other colors.
anne says
The rainbow is an inexpensive ball of acrylic yarn from Joann’s. I found it in the yarn aisle. We were just the other day and found rainbow and some other pretty mixes of colors. go check it out!
Benjamin Weaver says
I haven’t got a hula hoop, so this version of the project will have to wait a while. I have so far made several coasters using the inner part of a 6″ embroidery hoop and a two-finger version of your knitting. I was playing with the number of fingers and found that it works just fine with 1, 2 or 3 fingers and the results are quite different.
I also recently started Whittling and made a heart pendant for my wife. If I can figure out how to post photos I shall, because I used a two finger pattern to make a necklace with it. All you need to do is thread the pendant onto your yarn, and knit to half the length you ultimately want, then the tricky bit of pulling the loop over the pendant; then you simply continue knitting until it is the same length up the second side and done!
The only thing I have changed in your basic method is that I make a slip knot to put on my index finger to start. This makes it much easier *for me*, particularly if I am doing a one finger pattern.
Thank you so much for giving me this fantastic and useful craft. Also it is a great way to use up all the ends of my wife’s yarn after her knitting projects.
anne says
Benjamin,
Thanks so much for your wonderful comment. What a cool idea to make coasters! It sounds like you make a great team with you wife. Love the idea of the pendant. Have fun!
Christen says
This is the coolest thing ever!! I have a while to wait until my first child is ready for this…. at 7 months old she’d probably be okay if I just did it myself. 🙂 I picked up the supplies at Michael’s today to make a finger knit wreath. You are giving me so many fun things to do with yarn that will beautify our space- THANK YOU!
anne says
Christen, You’re awesome. She’ll be so entertained while you make your beautiful home goods! Have fun – and, I know she’ll have lots of yarn waiting for her when she’s ready!
Anonymous says
my hoop tends to get pulled out of shape while loading the shirt on it. I’ve tried larger shirts and smaller hoops while trying to make a rug big enough for my need. Any ideas on how to stabilize the hoop
anne says
Oh dear, you know I was worried that would happen when I first tried this, but I just didn’t have any problems. I’m wondering if you might need a different hula hoop? Mine was filled with water, of all things – but it was inexpensive, from Target. I think if you can look for something sturdier you might have more success. I used one of my husband’s t-shirts – something on the L/XL side.
Momtaylor says
just an FYI…you can buy the flexible pvc pipe at the hardware store and a ‘coupler’ that hooks the 2 ends together for under $5 for a long piece of pipe. That way you could make a much larger rug than what you get from a hula hoop if you want to.
anne says
awesome! that would be fabulous! Years worth of finger knitting 🙂
Amanda Pedro says
We have been having so much fun with this! Thanks so much.
http://byhookandthread.blogspot.ca/2013/03/finger-knitting-woven-rug.html
ning says
Wow thank you, I try to do with my boy >>
Anonymous says
how do you join the yarn
anne says
I just knotted each strand together with a square knot.
Asha Dsouza says
wow! very beautifu and colourful…
thanks for the tag. so wonderful job…
i love it..
Olga O says
I like so much!!! thanks!
Shannon Mokry says
My girls ask off and on for a rug for their room, soon to be rooms:D I haven’t wanted to spend the money, this is perfect, keeps them occupied with a project and I can set them up using old yarn I have deemed not soft enough for my current taste.
Louise says
Many, many thanks for introducing me to the four-finger knitting and this fab project 🙂
I made one with Year 3 and 4 children and they were absolutely hooked and delighted with the results! I posted a few pics here http://louisehunterhandmade.blogspot.co.uk/2013/05/the-finger-knitted-rug.html
with links back to your fab site of course!
Cristina says
Grazie!!!
Wonderful idea to teach something to my children
Anonymous says
I work in Inclusion and this project is just what I need to encourage a group of girls with persistence and preservance! Thank you
Mary Knutson says
This is very cool. Do you think you could use a trips of old t shirts to weave instead of yarn?
anne says
Absolutely old T-shirt strips would work. Give it a whirl and have fun!!
Ella says
Hi. My 5 year old made a huge ball of finger knitting and then I found this after googling what to do with it. He managed really well. My q – how did you fix it to the wall? Did you mount it in something first? It is too pretty not to hang. Thanks
June Puckett says
I really like this idea for the rug, but I have run into some problems. What kind of t-shirt was used? I used a stretch shirt which just keeps stretching. The a big bulky place in the middle where the strips cross each other. Am trying
to teach my granddaughter how to do this project but am stuck.
Please help.
Thanks,
June
anne says
Hi June, I did the hula-hoop rug with finger knit yarn. I’ve never done it with t-shirts. I think you need to make sure you’re not pulling the t-shirt. If it’s too tight, it will pull together and bunch up.
Nigel says
Hello Anne, you’ve done great job with that woven hula hoop rug!! I really like such creative thinking of your. I think I’m gonna try something like that DIY project. Thanks.
anne says
Thanks so much, Nigel. Have fun!
Celine Perreault says
Thank u so much for sharing this awesome project!! I am making one right now with my kids and it looks great! I love the fact that it doesnt take for ever to see results too!!:) did u ever try making a blanket??
anne says
Hi Celine,
Yes, you can make a blanket. Super fun to weave on a larger scale with the finger knitting!
Anne
joanne says
I need just a little more information on how to reweave the last spoke that was doubled all during the weaving. everything was great til I got to that last tie off thank you so much
flaxandtwine says
Hi Joanne,
Basically, you need that double spoke to be able to “tie around something. I took one of the spokes and tucked it back into some of the finger knit strands so that when I tied it to the other piece of the spoke, it tied around something. Does this make sense?
Anne
Lee Ann says
Hi Anne, I’ve been working on one of these and posting about it on my blog (see: http://freezeframelah.blogspot.com/2014/05/finger-knitting-project-update.html) I have one question. When I got to the part where you begin weaving in and out of the strips as separate pieces, I’ve noticed that I’m having a problem with the strips (white tee shirt) showing up in the weave. It might be because most of my finger knitting was in worsted weight yarn and all of it was done as 4-finger finger-knitting. Any suggestions? I’m trying to pull the finger knitting as close to the previous round as possible in order to cover the white strips but I’m getting mixed results. Up until now, everything has been great! Might just have to live with the white showing on part of this project. 🙂
Lee Ann
flaxandtwine says
Hi Lee Ann, As you continue, the warp (the tshirts) will start to disappear. You won’t ever get that center part to go away altogether. The finger knitting looks like its a reasonable size and should work. If they continue to stick out, you could try weaving just a little bit tighter (by don’t do it too tight that it starts to pull!) Good luck – it’s looking great!
Lee Ann says
Thanks, Anne! I have found that the more I weave around and push the yarn toward the center, the more it covers up the warp. Not worried about the center since I knew that would be visible. The only place that I can’t cover the warp is a round where I had some very bulky black yarn. Next time I’ll know to finger-knit that type of yarn one-finger style! 🙂 I’m going to post more on my blog as I progress. Right now my piece is approx. 14-15 inches in diameter. Thanks so much, again, for sharing this!
flaxandtwine says
Congratulations Lee Ann – sounds like a fabulous project!
Helen says
Just wondering if you could use material for this project. Love this idea
flaxandtwine says
Hi Helen, I’m not sure what material you are referring to, but you can used this technique with a lot of different materials. Have fun!
Anne
Kelly West says
Can we order a kit?
flaxandtwine says
Hi Kelly,
Thanks so much for your comment. I do not sell kits at this time. Good idea though!
anonymous says
I honestly can not figure out steps for the 7 to 9 inches part. I know it’s simple but simmering is not clicking.
flaxandtwine says
Hi! Thanks for writing. After you go around for 7 to 9 inches. you divide out the spokes further as the rug is getting bigger. So where you were going over and under the entire loop of the tshirt piece before, now you will split that loop and go over and under the individual strands of the loop. By doing that, you double your number of warp threads (t shirt strands). Does that make sense?
Thanks, Anne
Diane says
Boyfriend of 10 yrs died and want to take all his shirts and make myself a memory of him with this project thank you for the idea
flaxandtwine says
Oh Diane, I’m so sorry to hear that, but what a wonderful way to honor his memory. My heart aches for you.
Rebeca says
I keep on trying but when ever I do 1 way around the hoop it won’t switch can you help me? (Yes I did put 2 strips together.)
flaxandtwine says
Rebeca, The most important thing is to make sure you have an odd number of spokes, this is how the over/under switches when you get back to the beginning. For the first part of the rug,you do the over and under around the two strips (or the loop) of the tshirt together AND you put two spokes together (or four strips) to make it odd. After about 10 inches, you switch from going over and under the loops of tshirt (two strips) to the individual strips of the loops. I know this is confusing, but I’m hoping that this along with the photos will makes sense. Let me know!
Lorraine Curtiss says
Dear Sirs: I could not find a option to click on to get the pattern to print. Can you tell me how to do it? I greatly appreciate it very much.
Thanks,
Lorraine K. Curtiss
flaxandtwine says
HI Lorraine,
There is no way to print it out, other than to print from the website. There is no PDF pattern, though I will consider making a PDF for this one. That’s a good idea!
Kari says
I’m living every bit of this and can’t wait to make some wall hangings like this, and dreamcatchers! Also-
How would I make a blanket like this but square ? Thanks, Kari
flaxandtwine says
Hi Kari,
I’m glad! You would need to make or buy a square loom to make a square blanket.
Anne
JoeyB says
I love this idea, I’m halfway through my first attempt and I’m surprised how easy it is, I commute with my boyfriend every day and hate just sitting doing nothing in the car so the finger knitting gives me something to do, then at night while he’s playing video games I can weave sections in, pretty sure having small sections make things easier than a giant finger knitted ball, its very impressive though! I like it with all different size yarn, and I’m going to try finger knitting some garden twine just for extra texture. Thanks for the easy-peasy to follow instructions!!
flaxandtwine says
Hi Joey! What a wonderful comment. This makes me so happy to hear. I’m thankful to hear your story. I can just picture your beautiful rug growing bit by bit. xo
Sarah says
Do you think this could be done with a square instead of a circle? My husband can put together a frame but wasn’t sure if this would work the same way with a square too….
flaxandtwine says
If you move to a square, I wouldn’t do it in a clockwise motion – it would be challenging to keep the corners square. If you use a square or a rectangular loom, I would switch to weaving in a back and forth from the top to the bottom. Do you know what I mean?
anonymous says
I dint get to the step…in which the spokes are divided into two ??
flaxandtwine says
The most important thing is to make sure you have an odd number of spokes, this is how the over/under switches when you get back to the beginning. For the first part of the rug, you do the over and under around the two strips (or the loop) of the tshirt together AND you put two spokes together (or four strips) to make it odd. After about 10 inches, you switch from going over and under the loops of tshirt (two strips) to the individual strips of the loops. Does this make sense?
Mindie says
I just tried this with my daughter, and I had to improvise because we don’t have a hula hoop. We used an embroidery hoop and I used old socks to cut and use as the spokes instead, so of course it was a much smaller project, but I love how it turned out! Thank you for the very clear instructions and the knitted yarn idea instead of other ideas I’ve seen elsewhere. =)
flaxandtwine says
Hi Mindie!
Thanks so much for your comment. It is so wonderful to hear. I love your creativity with method – socks and embroidery hoop – perfect!
syma says
Sorry if this us a silly question but what exactly is finger knitting yarn and where do I get it from? This is so beautiful! !
flaxandtwine says
Hi Syma,
Thanks so much for asking. I’m glad you like it. You can easily make finger knit yarn. Here is a tutorial: https://www.flaxandtwine.com/2012/01/finger-knitting-how-to/ You can also learn how from my book, Knitting Without Needles, which comes out in September: http://amzn.to/1IvUQDV This will have all sorts of wonderful finger knitting projects!
Sharon Robbjns says
Love you crafts
flaxandtwine says
Thanks so much, Sharon!
Britney says
I’m new to finger knitting and i’m kinda lost. Did you finger knit the yarn first then wind it into a ball? If so how did you put it in the ball form? Was is the 1 finger knit or 4?
flaxandtwine says
Hi! I finger knit the yarn first and then you wind it into a ball. It was four-finger knitting. Enjoy!
Miranda says
Hi
I’ve just made one of these rugs using this scrap fabric twine
I made the twine a few months ago and have been looking for a project to use it in. This was perfect and I’m really pleased with the results! (I would post a pic to show you but unfortunately can’t on this forum.)
Thanks!
flaxandtwine says
How cool, Miranda! I would love to see it! Email me at flaxandtwine (at) gmail (dot) com!
Marita says
hello just I made this project but when they sack me ring is bent inward because ?
flaxandtwine says
Hi Marita,
I’d love to help you, but I’m not understanding your comment. Can you clarify?
Ava says
This is amazing! I’m almost done with mine, but the yarn won’t lay down flat. It wants to make a mountain like shape in the center. I’m not sure if the yarn is too tight or too loose. What do you suggest?
flaxandtwine says
I’m so glad you are enjoying the project! I had the same trouble at first. It’s counter intuitive but a volcano like that is an indication that you’re weft is too tight. The outer tighter circles pull in on the inner circles making it bulge. If you loosen the outer circles some, it should fix the problem. Good luck.
Nirupama says
Just love it!! ?
flaxandtwine says
Yay! Thanks!!
Nikki says
Hi,
What time of wool is it? What do I search for online? Im in the uk. I want colours like urs but can’t find wool that interesting!
Love it btw, thanks
Nikki
flaxandtwine says
HI Nikki, I’m so glad you like it! Unfortunately I can’t point to any specific wool. It literally was such a mish mosh of yarn that my son found in my stash. The colorful rainbow yarn I found at the local craft store. Do you have craft stores that cary yarn there?
Cindy Zeamer says
What did you use on the back to stop it from slipping on the floor?
flaxandtwine says
Hi Cindy, I’m not sure what part you’re talking about. I think I just kneeled in front of it so it wouldn’t slip. Then, when I was working on the table, the weaving kept it in place. Can you clarify?
Loretta says
Have you tried this with plarn? I am thinking of doing this with plarn for a camp project and I am looking for anyone who might have done it.
flaxandtwine says
Hi Loretta,
Do you just mean acrylic yarn? A lot of what you see in there is acrylic. I think it would be great!
Kristan Smith says
Could this be done with the large yarns instead of using fingernlknitted yarn. Was thinking of using this as a class activity for early finishers in my art class.
flaxandtwine says
Hi Kristan, Absolultely. Here is another example of the hula hoop rug, only done with t-shirt yarn. https://www.flaxandtwine.com/2015/08/woven-hula-hoop-rug/
Niki says
I tried to read through comments so I wouldn’t duplicate this question but there are so many, so I apologize if this has already been asked. Can’t you just do 19 spokes rather than doubling up two? Is there a need to have the double spoke? Thanks!
flaxandtwine says
Hi Niki, The spokes are created by stretching one loop across the hula hoop, thereby creating two spokes. So it will always come out even, hence the need to double up. If you rig a spoke from the middle and tie it around the hoop, you could do 19.
Knitting Bee says
Wow, amazing work of art, the end result is breathtaking!
Carol says
” After adding the 10 strips stretched across the hula-hoop into 20 spokes, you’re ready to start.
You need to create an odd number of spokes to make the weaving pattern (over/under) work. Do this by pushing two of the spokes together. Even out the spacing on rest of the spokes across the hula hoop.”
Hello, my daughter & I would love to make one but I don’t understand this, you say to use 10 strips making 20 spokes around hoop, but then you put two of spokes together, making 19 (odd #) spokes?
flaxandtwine says
Hi Carol, whenever you’re weaving around a circle, you need an odd number of spokes. So yes, push two of the spokes together so you have 19 total spokes. Later, you will separate these double strips into single, but you still need to maintain an odd number so one of them you keep double. Does that make sense?
Anne
Kylie says
Hi, I am having an issue with keeping an odd number once I switch to diving the single spokes into two. You mention “For the other spoke, have the two parts of the loop remain together so that you maintain an odd number of spokes.” What loop are you referring to? Once I divide all of my spokes into two, I now have an even number. What am I supposed do in order to again have an odd number? I’m driving myself insane trying to figure this out. Thanks
flaxandtwine says
Hi Kylie,
So to keep it odd, you split every spoke but one. One of the spokes you keep together, the others you split, thereby keeping the number odd. Does this make more sense to you?
Kylie says
It just clicked in. Lol
Maria says
Will this work with thick yarn?
flaxandtwine says
Absolutely! Thick yarn would look beautiful in this project!
Toni says
What is the purpose of tying the two spokes (?) together?
Why wouldnt you just remove a spoke to have an odd number?
flaxandtwine says
Hi Toni, The t-shirt loops are put on so that they stretch across the entire hoop adding two spokes at time. As such, you’ll always have an even number. Therefore, you have to push two together to get an odd number.
Heloisa de Mesquita Inoue says
Amei, parabéns!
Jenny Cooper says
Hi, would it be possible to use old sheets for the warp spokes by cutting them into strips and then tying the ends to make loops? Or do you need the stretchiness of T-shirts?
flaxandtwine says
Hi Jenny,
I think this would work just fine! Let me know how it goes!
Anne
Ella says
Hi. My 5 year old made a huge ball of finger knitting and then I found this after googling what to do with it. He managed really well. My q – how did you fix it to the wall? Did you mount it in something first? It is too pretty not to hang. Thanks
flaxandtwine says
Hi! I’m so glad your son has loved finger knitting! I think I just hung it on two nails to the wall. i think I put them at 1 and 11 or so. I’m so glad you’re hanging it!
Asha says
Thanks so much for this wonderful finger knitting idea. My granddaughters love arts and well this is one that they can do for each other. Cant wait to try it. We will try and add pictures when they are done. Thxs
flaxandtwine says
Thanks for leaving a message! I would love to see photos when they are done! Enjoy!!