


Rainbow in a Jar

I remember doing this rainbow salt jar project when I was young– one of my favorites. I loved the process of making it, the way the colors looked next to each other, how the layers undulated in the jar. I remember begging my mother to let me do this more. She claimed that it used too much salt – way too expensive. Given that the salt I bought my children was $0.50 a canister and could make four of these each, I realize now that my mother was avoiding the mess– Hrmmph. Well, fair warning, this is a salty mess, but oh so much fun. And relatively easy to clean up with 2 or 3 sweepings.
I love getting ready for projects, so much promise and cooperation.


This project makes for a good easter centerpiece – so many pretty pastels.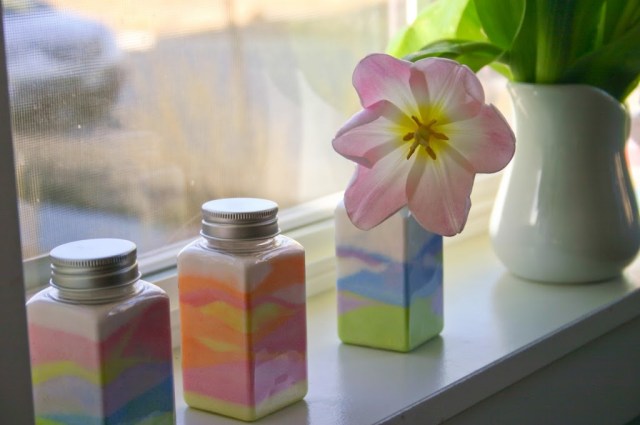


Rainbow Salt Jar
Materials
Small Jars –We’re out of the baby-phase so no baby food jars in this house, but if you have them, they are ideal for this project. I found some old plastic craft jars I hadn’t used, so went with that. I highly recommend using glass as the chalk dust sticks less, like these.
1. Gather Materials. My suggestion is to get a set of materials for each child – makes for less yelling and grabbing. I know we’ll use them again, too.

Plus, that way they get to label.

2. Pour salt on a piece of paper, enough to make a layer about 1/4 “ thick in your chosen container. This is tactilely so wonderful – let your kids play with it – or design with it.


3. Take your chosen chalk color and rub the chalk back and forth across the salt until you get the desired color saturation.


4. Carefully, pour layer of colored salt into container.

5. Use the opposite side or a new piece of the paper for a new color (these pages can be used for chalk drawings after the project is over).

6. Pour layers at angles and around the jar to get interesting strata. You can rotate the jar while pouring to achieve this.

7. Repeat process with new colors until jar is completely full. Take care not to shake the rainbow salt jar as this will mix the layers up – brown salt, no fun. Add lid and Voila!


8. Take a moment to relish in the happy feeling you get making something and appreciate the colors and layers and how they look.

9. Display your rainbow salt jar artfully.


Leave a comment
This site is protected by hCaptcha and the hCaptcha Privacy Policy and Terms of Service apply.