


Hand Woven Basket Tutorial for Easter

I have a hand woven basket tutorial for you, just in time for Easter! This simple but classic basket, with its sweet twisted handle, and scalloped edge, will charm all who see it. I love that all you need is a ball of hemp twine and a darning needle! After Easter, it will make a perfect little plant basket, too.

I adore free weaving containers like this. There’s something so satisfying about creating something from nothing. In this hand-woven basket tutorial, I use a mold to help maintain the shape of the basket. You can use just about anything square in your pantry for this, including a glass vase, a plastic Tupperware or another food container. If this is your first attempt at making a basket, just have fun with it! You’ll be addicted before you know it.

Making this basket gave me the best reason to stock up on Jordan Almonds. These candies were my late Father’s favorites. I love having things he loved around me. For me, Easter is a wonderful holiday to bring the family together just as the Earth is coming back to life again. Spring brings renewal and beauty and lots of reasons to celebrate. I hope you use this hand woven basket tutorial and give it a whirl!
Hand Woven Basket Tutorial for Easter

Materials for Hand Woven Basket Tutorial:
:: One ball Hemp Beadery Hemp Cord, 100lb strength (3mm), 40 yd (37m), 7 oz (200 g)
:: Washi tape or masking tape
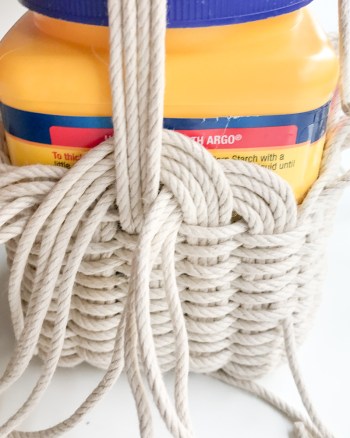
:: 3.5" x 3.5" square mold (I used a cornstarch container, but you can use anything hard and square, like a glass vase, a Tupperware container or the like) If you use a bigger container, you will need more cord.
:: Sturdy darning needle with a large eye
Weave the base:

Cut ten bundles of four cords, 9 of which are 25" long each. Cut one bundle at 30" long, which will be the handle. Tape five of the 25" long bundles vertically side by side about ½” apart. You will weave the other five bundles horizontally in an over/under pattern at the mid-point of the vertical cords.

Tape these horizontal bundles to the surface as you weave as they can be a bit squirrely. Weave the 30” bundle in the middle of this set of five horizontal bundles, which will eventually become your handle.

Move woven area close together, re-taping as necessary so your woven base is tighter. With the remaining hemp cord ball (your working cord), line the end up at the bottom of the horizontal cords. The tail of the working cord should match the ends on the left. This cord will be your odd single cord which enables a continuous over/under pattern around the basket. Weave the working cord over and under the bundles, around the base. Remove the tape as you go.

When you return to the odd cord, go over or under it in the same pattern as the rest of the rounds. As you go around, tighten your woven base even more.
Transfer Weaving to Base

After six times around the base, transfer your weaving to the bottom of your mold. This mold will help maintain the shape of the woven basket. It is alright if your base is smaller than the container and the sides tighten around the bottom corners of the mold. Continue to weave on the mold going over and under the bundles and the single cord as you were before. As you go, tighten the working cord around the mold. You may want to pull on the bundle ends as you weave. Doing so will straighten and organize the rows of working cords as you go.

At the desired height or when you get to the end of your working cord, feed cord on to a darning needle. Bury it down into the weaving at the side of the odd cord, following an over/under pattern.
Finish the Top
To finish the top, take each bundle of cords and bring it behind the next bundle all the way around the basket. Placing the bundles here is a temporary position but helps organize the strands for the next part.

When you get back around to where you started, tuck the last bundle through the arc created by the first bundle.

Now, for each end of each bundle, use your darning needle to bury the end down into the weaving about three visible rows. Bury all the ends from one bundle one section over from where they are coming from (i.e., not in the adjacent section). If this gets tight and difficult to do, go back to your working cord and loosen the weaving for a couple of rows. NOTE!! Do not bury the ends of the extra-long bundle. These will become your handle (just skip this bundle and its respective burying section) as you go around.

With the extra long bundle, you will twist the lengths to become the handle. Tuck it aside for now while you finish the sides.

I trim the ends about an inch away from where they exit the basket, so it’s easier to work with. Then, spend some time organizing the arcs as desired. When the top of the basket looks how you want, trim away each cord as close to where it exits the basket as possible. Remove the mold.

Bring the two ends of your twisted handle through the arc and two ends under one row of the working cord to the inside of the basket. Tie a knot with the ends of your handle on the inside of the basket. Trim all ends. Fill ‘er up!

This hand woven basket tutorial was originally published in partnership with Martha Stewart where I am a regular contributor. Looking for other Easter projects? I just posted Flax & Twine’s Favorite Easter projects here.


Leave a comment
This site is protected by reCAPTCHA and the Google Privacy Policy and Terms of Service apply.